Introduction
This is my writeup for OverTheWire’s ‘Bandit’ wargame, which is essentially a capture the flag (CTF) challenge with the flag in each level being a password you’ll need to ssh into the next level. Each level has a problem statement indicating the location of the password on the server, in addition to some useful commands one might need to retrieve it.
Please look at the OverTheWire Bandit website for the problem statements. This document is not so much a tutorial or walkthrough, but a journal to document my thought processes and the things I learnt in my journey to solve all the levels.
For context, I do have some experience using Linux commands and git so not everything is completely foreign to me. A goal I set for myself is to use the man page as much as possible and Google and the internet as little as possible.
Here goes…
Levels
- Start $\rightarrow$ Level 0
- Level 0 $\rightarrow$ Level 1
- Level 1 $\rightarrow$ Level 2
- Level 2 $\rightarrow$ Level 3
- Level 3 $\rightarrow$ Level 4
- Level 4 $\rightarrow$ Level 5
- Level 5 $\rightarrow$ Level 6
- Level 6 $\rightarrow$ Level 7
- Level 7 $\rightarrow$ Level 8
- Level 8 $\rightarrow$ Level 9
- Level 9 $\rightarrow$ Level 10
- Level 10 $\rightarrow$ Level 11
- Level 11 $\rightarrow$ Level 12
- Level 12 $\rightarrow$ Level 13
- Level 13 $\rightarrow$ Level 14
- Level 14 $\rightarrow$ Level 15
- Level 15 $\rightarrow$ Level 16
- Level 16 $\rightarrow$ Level 17
- Level 17 $\rightarrow$ Level 18
- Level 18 $\rightarrow$ Level 19
- Level 19 $\rightarrow$ Level 20
- Level 20 $\rightarrow$ Level 21
- Level 21 $\rightarrow$ Level 22
- Level 22 $\rightarrow$ Level 23
- Level 23 $\rightarrow$ Level 24
- Level 24 $\rightarrow$ Level 25
- Level 25 $\rightarrow$ Level 26
- Level 26 $\rightarrow$ Level 27
- Level 27 $\rightarrow$ Level 28
- Level 28 $\rightarrow$ Level 29
- Level 29 $\rightarrow$ Level 30
- Level 30 $\rightarrow$ Level 31
- Level 31 $\rightarrow$ Level 32
- Level 32 $\rightarrow$ Level 33
Start $\rightarrow$ Level 0
I made the SSH connection using
ssh bandit0@bandit.labs.overthewire.org -p 2220
and entered the given password when requested.
Level 0 $\rightarrow$ Level 1
I used cat to display the contents of the readme file and hence retrieved the password. No problem.
Level 1 $\rightarrow$ Level 2
Using cat - as before no longer works. Everything that I type just ended up getting echoed.
A quick Google search for ‘dashed filename’ shows that we have to specify the full path when the file we want has a dashed filename, like so:
cat ./-
It turns out that the ‘-’ character is commonly used to specify stdin and stdout in the context of a bash shell. In fact, its an alias for either /dev/stdin or /dev/stdout (depending on context). Therefore, cat - was equivalent to telling the shell to cat everything I input in stdin, i.e. whatever I typed into the command line, and hence everything I typed was echoed back to me.
Level 2 $\rightarrow$ Level 3
We can escape the spaces in the filename either with a backslash character, or enclosing the filename in quotes, like so:
cat 'spaces in this filename'
Level 3 $\rightarrow$ Level 4
I cded into the directory, used ls -a to display the hidden file, and then used cat <name of hidden file> to display its contents.
Level 4 $\rightarrow$ Level 5
From the man page for file, I learnt that executing it runs some tests on the specified argument(s) in order to classify it as ’text’ (meaning ASCII characters/human readable), ’executable’, or ‘data’. Hence I ran file with all files in the directory as the argument, taking care to handle the ‘-’ character in the filenames, like so:
file ./*
I was thus able to quickly identify the correct file to look at.
Level 5 $\rightarrow$ Level 6
The files to search through are all contained in subdirectories of the inhere directory and it would take too much effort to look through them all to find the one that matches the properties specified.
I read up on the find and realised that its possible to use it to search for files in a directory hierarchy (i.e. look in subdirectories and subdirectories of those, and so on) which match a specified criteria, which fits our purposes nicely.
I found that there was only one file under the inhere directory which was 1033 bytes; the final command I used was:
find -size 1033c ! -executable
which gave the name of the file containing the password. Notice that this command only implements 2 of the 3 specified properties - its missing the ‘human-readable’ property. I couldn’t find any relevant option for it for the find command, but perhaps we could workaround this by piping the output of this find command to file if necessary.
Level 6 $\rightarrow$ Level 7
Since the hint is that the file is located somewhere on the server, I cd-ed to the root directory and ran a find command with tests matching the file properties described.
The name of the file containing the password was hidden in the output by many entries indicating unsuccessful tests because of denied permissions. Of course in this small sample I could look through line-by-line, but this wouldn’t be possible with bigger sample sizes.Therefore, I decided to try to find an efficient way to extract the desired result.
I initially tried to find an option in find to ignore the entries with ‘permission denied’, but I then thought that it might be easier to execute find first then use grep -v to look for entries in the output not containing the string ‘Permission denied’.
After consulting the man page for grep and trying many different configurations, I still couldn’t get it to work properly. find ... | grep -v 'Permission denied' still resulted in all the ‘permission denied’ lines being printed.
I then consulted Google, and learnt that this was likely happening because grep ran on stdout, whereas the ‘permission denied’ entries were directed to the stderr stream, which resulted in the error messages still being printed in the console.
One way to deal with this is to redirect the stderr to stdout before executing grep, but I decided to essentially discard all the stderr messages (i.e. the permission denied entries) by redirecting the stderr (file descriptor 2) to /dev/null. The redirection causes all the error messages from the find command, including the ‘permission denied’ ones, to be redirected to a new file called /dev/null which is immediately discarded.
As such, I used the following command to cleanly output the name of the file containing the password:
find -type f -group bandit6 -user bandit7 -size 33c 2>/dev/null
Level 7 $\rightarrow$ Level 8
We simply redirect the output of the cat command to the grep command using | to search for the ‘millionth’ keyword:
cat data.txt | grep 'millionth'
Level 8 $\rightarrow$ Level 9
I took the hint in the problem statement and went to look at the uniq command. From reading the description section in its man page, I found out that the command filters adjacent matching lines in the input, i.e. for each line, it looks at adjacent lines and discards duplicates. This means that the lines in the data.txt file had to be sorted, which could be done using the sort command.
Since I was interested in the string which appeared only once, simply filtering out duplicated strings wouldn’t be enough as we won’t know how many times each string appeared in the original file. Therefore, we need to use the --count option to additionally display the number of occurrences of each unique string.
We can then simply redirect the output to a grep command to find the string with a count of 1.
Putting it all together with pipes, I solved this using:
cat data.txt | sort | uniq --count | grep '1 '
Level 9 $\rightarrow$ Level 10
The strings command prints the sequences of human readable lines in the file. I simply used
strings data.txt | grep '='
to get the password.
Level 10 $\rightarrow$ Level 11
Running
base64 -d data.txt
decoded the data.txt file and retrieve the password.
Level 11 $\rightarrow$ Level 12
I knew that I had to rotate the characters 13 positions in order to decrypt the file. One option was to put it into a rot cipher decoder on the internet, but I wanted to try to do it in the command line.
The tr command looked promising, and with some help from Google I managed to figure out how to specify the character set to use for the translation. The final command I used was:
cat data.txt | tr [a-z] [n-za-m] | tr [A-Z] [N-ZA-M]
[a-z] means all lowercase letters from a to z, and this is translated to [n-za-m] which represents n, m, o, p, …, k, l, m, i.e. the lowercase characters rotated 13 positions.
Level 12 $\rightarrow$ Level 13
I performed the mkdir and cp process detailed in the problem statement, and I used xxd -r data.txt to reconstruct the file from the hexdump, but I still got gibberish.
I ran file on the reconstructed data2 file and found that its file type was ‘gzip compressed data’. I then used mv to rename data2 to data2.gz and ran gunzip data2.gz to unzip it.
This replaced data2.gz with a new file, data2. I ran file again and found that it was a ‘bzip2 compressed data’ file. I repeated the same steps above, first using mv to rename data2 to data2.bz2, and then used bunzip2 data2.bz2 to unzip the file.
This replaced data2.bz2 with a file called data2 of file type ‘gzip compressed data’. I repeated the same process to unzip this file as I did before, and I ended up with the file data2 of type ‘POSIX tar archive’, which I renamed to data2.tar using mv.
Running tar -xvf data2.tar gave me data5.bin, another POSIX tar archive. Running tar -xvf data5.bin gave me data6.bin, a bzip2 compressed file.
At this point I was wondering how many more files I still had to decompress. I did the same renaming and decompressing/extraction process a few more times and I finally got a file which contained ASCII text and the password.
Level 13 $\rightarrow$ Level 14
While in the bandit server, I tried ssh bandit14@bandit.labs.overthewire.org -p 2220 -i sshkey.private but it said that the connection was reset.
A quick search yielded that I should use
ssh bandit14@localhost -p 2220 -i sshkey.private
instead. I had to use localhost instead of the host address because I was trying to log in to another account on the server I was already on.
Level 14 $\rightarrow$ Level 15
I saw that one of the commands I might have needed to solve the level was telnet, and upon reading its man page I realised that it is used for interactive communication with another host. I decided to try
telnet localhost 30000
which opened a telnet prompt in the console. I entered the password for this level and got the password for the next level in response. Nice.
I did some reading and learnt that telnet was used to provide access to terminals on a remote host, but due to security concerns (because telnet transmits all data in plaintext), ssh is more popular for that now.
Level 15 $\rightarrow$ Level 16
I read the man page for openssl s_client and established a connection with the target using
openssl s_client -connect localhost:30001
Entering the password for the current level yielded the password for the next level.
Level 16 $\rightarrow$ Level 17
To figure out which ports between 31000 and 32000 had a server listening on them, I used nmap localhost -p 31000-32000. Next I had to identify which of these spoke ssl. I managed to do this simply trying to use openssl s_client to connect to each of the open ports identified with the nmap command earlier, and I managed to find one which gave the private key for the next level.
This brute force method was feasible because there weren’t many ports to try, but from what I gathered from a quick search online, there isn’t a dedicated command for checking if a server has SSL enabled, and the best way to distinguish is simply verifying if a connection using s_client is successful.
Perhaps if there were more ports I could’ve stored the open port numbers in an input file and wrote a script to automate the process of trying to connect to them using s_client. The return values of the connection attempt would indicate whether or not the server on the port spoke SSL.
I simply saved the private key obtained in a file on my computer and connected to the bandit17 (I had to use chmod to change permissions of the key file before ssh would work).
Level 17 $\rightarrow$ Level 18
To compare both files I simply executed
diff passwords.old passwords.new
The output showed that line 42 of the old and new password files differed (42c42). The output also showed the value of line 42 in the new password file, the password for the next level.
Level 18 $\rightarrow$ Level 19
I observed that even though I was able to connect to the game server, I would be immediately logged out once it was established. I consulted the man page of the ssh command and realised that it was possible to specify, as part of the original ssh command, shell commands which would be executed once the connection was established. Therefore, I used
ssh bandit18@bandit.labs.overthewire.org -p 2220 cat readme
to print the password for the next level to the console once the ssh connection was established and before I got logged out. This was a fun challenge.
Level 19 $\rightarrow$ Level 20
I used ./bandit20-do to execute the binary and found that it allowed me to execute commands as bandit20. As such, to get the password for the next level I simply ran
./bandit20-do cat /etc/bandit_pass/bandit20
Level 20 $\rightarrow$ Level 21
To be honest I had no idea how to solve this level and had to consult some writeups online. I found that I had to basically:
-
Identify an unused port on localhost (which could be easily done with
nmap) -
(a) Use
ncwith the-lflag to listen for incoming connections on the identified port on localhost, and…(b) pipe
echo <level 20 password>to the abovenc -lcommand so the password is read when a connection is made to the port. -
While the
ncis running, run thesuconnectbinary to connect to the port identified in 1 to get the password for level 19.
To accomplish 2 and 3 at the same time, I used tmux with the help of an online tutorial to start a new session with 2 terminals side by side.
After choosing a suitable port with nmap, on the first terminal I ran echo <level 20 password> | nc -l localhost <port>. I then switched to the second terminal and ran ./suconnect <port>. This caused a connection to be made to <port> and the echo command ‘sending’ the <level 20 password> to the suconnect binary. The binary transmitted the password for the next level to the connected port on localhost where nc was still listening on, and the password for the next level was printed to the console.
I learnt that there was a way to accomplish this without using tmux, which is to run nc in the background by using the & option. This allowed one to continue using the terminal for running suconnect while having nc listening at the same time.
Level 21 $\rightarrow$ Level 22
I navigated to /etc/cron.d as directed and found a file called cronjob_bandit22, which referenced an executable called cronjob_bandit22.sh in usr/bin. I read the contents of the executable and found that the password to access bandit22 was written to a specified file in the /tmp directory. I simply used cat to display the contents of that file and retrieved the password to access the next level.
Level 22 $\rightarrow$ Level 23
I looked at the directory as directed and noticed a file cronjob_bandit23 which made references to cronjob_bandit23.sh in /usr/bin. Reading cronjob_bandit23.sh, I found that at the end of the script a password is written to a specific file in the /tmp directory.
The name of the specific file the password will be stored in is determined by the output of the command echo I am user $myname | md5sum | cut -d ' ' -f 1 where $myname is the output of running the whoami command.
I figured the expected value of $myname was bandit23, and hence ran
echo I am user bandit23 | md5sum | cut -d ' ' -f 1
which gave me the name of the file in the /tmp directory containing the password for bandit23.
Level 23 $\rightarrow$ Level 24
By looking in cron.d as directed, I identified the relevant shell script. Its contents were:
#!/bin/bash

myname=$(whoami) # line 1

cd /var/spool/$myname/foo # line 2
echo "Executing and deleting all scripts in /var/spool/$myname/foo:" # line 3
for i in * .*; # line 4
do
    if [ "$i" != "." -a "$i" != ".." ]; # line 5
    then
        echo "Handling $i" # line 6
        owner="$(stat --format "%U" ./$i)" # line 7
        if [ "${owner}" = "bandit23" ]; then # line 8
            timeout -s 9 60 ./$i # line 9
        fi
        rm -f ./$i # line 10
    fi
done
Let’s analyse this script line by line.
Lines 1-2: the whoami command is executed and stored in the variable myname. The working directory is then changed to the foo subfolder of /var/spool/$myname/foo. My guess is that the expected value of $myname is bandit24, and I verified this by navigating to the /var/spool folder and finding that bandit24 is the only file with a ‘bandit’ name in it.
Line 3: a message is printed out to the console telling the user that all scripts in a particular folder, in this case /var/spool/bandit24/foo will be executed and deleted. The problem statement says that I will have to write a shell script which will be deleted once executed. /var/spool/bandit24/foo is probably where the script should be.
Line 4: this is initialising a for loop iterating through all the contents of the /var/spool/bandit24/foo folder, with the names of the files being stored in the variable i.
Line 5: indicates each iteration of the for loop evaluates whether i is not the string representing the current directory (.) and (represented by -a) not the string representing the parent directory (..). The rest of the code in the loop executes only if this evaluation returns true, and will continue with the next iteration of the for loop, i.e. the next file in the folder otherwise.
Line 6: a message is presented to the console indicating that file i is being handled.
Line 7: the stat --format "%U" ./$i extracts the username of the owner of the file i, which is stored in the variable owner.
Lines 8-9: if the owner of the current file is bandit23, then line 9 is executed. Line 9 tries executing the current file (the ./$i at the end) and if the execution takes more than 60 seconds a SIGKILL signal (’-s 9’ from man timeout and kill -l) will be sent to kill the program.
Line 10: removes (deletes) the current file.
From analysing the script above, my idea was to write a script to be placed in /var/spool/bandit24/foo so that it is executed by /usr/bin/cronjob_bandit24.sh. The script will be something similar to cronjob_bandit23.sh and cronjob_bandit22.sh where the password for bandit24 is written from /etc/bandit_pass to a file in /tmp for me to retrieve.
The script I wrote was:
#!/bin/bash
echo "Copying passwordfile /etc/bandit_pass/bandit24 to /tmp/bandit24_pass"
cat /etc/bandit_pass/bandit24 > /tmp/bandit24_pass
I intiially encountered some problems with ‘bandit24_pass’ not being created at all. Revisiting cron.d/cronjob_bandit24, I found that cronjob_bandit24.sh will be ran either every minute or upon reboot. I went back to the foo folder, recreated my script, and waited for a minute. I then observed that the script I created disappeared as expected but there was still no ‘bandit24_pass’ in /tmp.
After some digging online, I suspected that this might be a permissions issue, i.e. bandit24 not having enough permissions to execute my password retrieval script. Sure enough, after creating the script and running ls -la on it I found that there were no x (execute) permissions assigned to any users.
Therefore, after creating the script, I quickly executed chmod 777 <script name> within a minute to change the permissions of the script before it is ran. After this the script ran as expected and I was able to retrieve the password for the next level.
Level 24 $\rightarrow$ Level 25
I figured the only way to brute force the 10000 possibilities was to use a script to generate all 10000 possibilities then pipe them into a nc session as input.
My script get_bandit25_pass.sh is:
#!/usr/bin/env bash

password="<bandit24 password here>"

for ((i = 0 ; i < 10000 ; i++)); do
	printf "%s %04d\n" ${password} $i
done
and by executing ./get_bandit25_pass.sh | nc localhost 30002 I managed to retrieve the password for the next level.
Level 25 $\rightarrow$ Level 26
I found a sshkey for bandit26 in the bandit25 home directory. I copied the sshkey to a file on my local device, then tried logging in to the bandit26 server using it, but was immediately logged out.
I tried to add bash commands at the end of the ssh command just like in level 18 in an attempt to carry out some discovery, but every command I tried seemed to cause the connection to hang, requiring me to have to manually terminate it.
After some research I found that information about user accounts on the system such as home directory, user and group ID and more importantly, the shell, is stored in /etc/passwd. I found that the shell for bandit26 was /usr/bin/showtext. Analysing the showtext file I found that it first sets the terminal emulator to linux, executes more on a file called text.txt located in the home directory of bandit26, then closes the connection.
To be honest I was a little stuck and had to look at a walkthrough for some clues. The first thing to note is that even though connection to bandit26 automatically terminates, it terminates after printing some ASCII art for bandit26 not present in previous bandit levels:
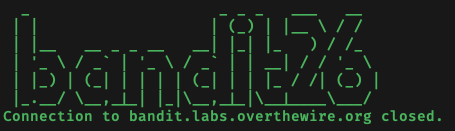
This corroborates the showtext script, and the text.txt which more is used to display probably contains the bandit26 ASCII art. Since the ssh connection is closed only after the more command terminates, to delay the disconnection we can delay the more command from terminating.
Since the more command displays file contents one screenful at a time, we can delay the more command from terminating by resizing the screen to as small as possible before initiating the ssh connection.

By reading the man page we can use v while more is executing to launch an editor for the text.txt file. While in the editor, we can use :e /etc/bandit_pass/bandit26 to open the bandit26 password file for editing.
Level 26 $\rightarrow$ Level 27
Continuing on from where we left off the previous stage, to get the password for bandit27 we still need to obtain a shell so we can actually run some commands. It turns out that a shell can be launched from within vim using :shell, but the default shell first has to be changed from showtext to bash, which can also be done from within vim using :set shell=/bin/bash while in the command mode of the editor.
Once we have a bash shell we can simply make use of the bandit27-do executable to retrieve the desired password from /etc/bandit_pass/bandit27.
Level 27 $\rightarrow$ Level 28
First I changed the working directory to /tmp/bandit27 where bandit27 had permissions to create files and folders. Then I executed git clone ssh://bandit27-git@localhost:2220/home/bandit27-git/repo to clone repo to the current working directory. The password for the next level was quite straightforward to find after this.
Level 28 $\rightarrow$ Level 29
I cloned the repo as directed and analysed the README.md file. It displayed the credentials of bandit29 with the password redacted. I executed git log to check the commit history, and found that there was a commit with the comment “fix data leak” after one with the comment “add missing data”. My guess is that someone accidentally committed the password for bandit29 and then redacted later to fix the leak. So if I am able to revert the file back to the pre-redaction commit I should be able to retrieve the password.
Thus, I ran git revert <commit ID of the fix info leak commit> and saw that the password for bandit29 in README.md was no longer redacted.
Level 29 $\rightarrow$ Level 30
After cloning, I started out by digging through the .git directory and the commit history, but I didn’t find anything helpful. However, since the password value in the README.md file says “no passwords in production!”, I guessed that there were other pre-production branches which might be interesting to look at.
To find all the branches available, both local and remote, I executed git branch -a. I found that there were a few branches including one called dev. To switch to that branch, I executed git checkout -b dev. README.md showed the password for bandit30.
Level 30 $\rightarrow$ Level 31
I cloned the repository and did some digging but to found nothing useful. It was only when I looked online at lists of commonly used git commands did I find a lead. I ran git tag to show all the created tags and found that there was a tag called secret (which isn’t applied to any commit). I then used git show secret to reveal the annotation message associated with the secret tag, which is the password for the next level.
Level 31 $\rightarrow$ Level 32
This level required me to push a file to the remote repository. I fortunately already had some experience doing this.
First, I used vim to create the text file specified. I then tried adding the file to be tracked by git but found that the .gitignore file specified that .txt files were to be ignored. So I removed ’txt’ from the .gitignore file, then added key.txt to be tracked by git by running git add key.txt. Next, I committed my changes by running git commit -m <commit message>. Finally, I executed git push origin master to push the changes (including the key.txt file) to the remote repository (origin) on the master branch. The password for the next level was then revealed in the status message of the push.
Level 32 $\rightarrow$ Level 33
I spent a good half an hour trying random stuff to try to understand how the uppercase shell processed input. I knew I couldn’t rely on most of the usual bash commands because they were automatically capitalised and wouldn’t work, so I tried using bash variables like $HOME and $PWD but didn’t get very far.
I then stumbled upon a forum post with someone asking how to check which shell they were using. The top answer was to use echo $0, but knowing that echo wouldn’t work for me I just entered $0… and I magically obtained a shell!

I then executed /bin/bash to switch to the familiar bash shell and now everything was ‘back to normal’. I then tried to understand why entering $0 worked. By looking at the /etc/passwd file I verified that bandit32 starts up with uppershell as the default shell. From my research, $0 stores the value of the current shell the user was in.
So it turns out that when I was in uppershell I was actually in sh. I actually missed out a little detail corroborating this and might’ve helped me solve this earlier: while in uppershell, the output of most executed commands began with sh : 1 : ..., just like in sh. Therefore when I executed $0 in uppershell sh resolved $0 to ‘current shell’, i.e. sh and executed sh which gave me the shell.
It turns out that uppershell was executed as bandit33 which can be confirmed by running whoami. This means that retrieving the password is simply going to the /etc/bandit_pass folder and looking at the relevant file. This was a fun level.
(If you are stuck in uppershell, you can terminate the ssh session by hitting enter then ~.)
Conclusion
Connecting to bandit33 gave the following:
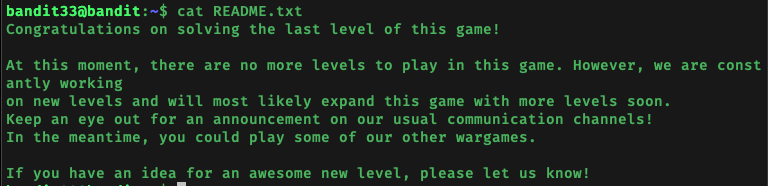
The end! This has been a long but extremely fun and fruitful journey. Some levels were pretty simple because I had some experience with the necessary commands, and some levels forced me to familiarise myself with new commands I’ve never used before. Some things I’ve learnt along the way include:
- using network utilities like
nc,nmap,openssl s_client, andtelnet - analysing and writing bash scripts
- making
sshconnection with private key - understanding environment variables such as $0, $SHELL, $HOME etc.
- understanding cronjobs
- essentials like
grep,|,uniq,tr,file,find,diff,/dev/null,stdout/stderrredirection, etc.
and much much more…
The levels I found the most challenging were level 25 (the more level) and level 20 (make connection while listening on port), and the levels I enjoyed the most were level 13 (automatic ssh disconnect) and level 32 (uppershell).
This challenge took me around 2 weeks working on average 2h a day to complete (including writeup). I won’t say that I’m now an expert in any of the topics covered in this wargame, but I can say that it has helped me know what commands were out there and what their functions are. On to the next one!